
If you’ve ever walked into a room and immediately thought, “Wait… didn’t I clean that already?” you’re not alone.
Cat urine has a frustrating habit of lingering long after the visible stain is gone.
I learned this the hard way when repeated cleaning, air fresheners, and even carpet replacement failed to eliminate the smell.
What many homeowners don’t realize is that the real problem often lies beneath the surface—in the subfloor. Once urine soaks into wood, ordinary cleaning products can only do so much.
In this guide, I’ll explain how to properly seal cat urine odor in a subfloor so you can finally get rid of the smell instead of just masking it.
How to Seal Cat Urine in Subfloor?
When cat urine soaks into a subfloor, cleaning the surface alone is rarely enough.
The urine crystals and odor-causing compounds can remain embedded in the wood, continuing to release unpleasant smells long after the original accident occurred.
The solution is to neutralize the urine first and then seal the affected area so any remaining odor can’t escape. Here’s the process I recommend.
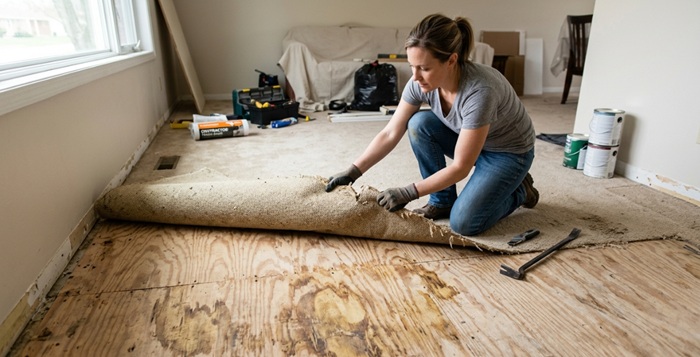
Step 1: Remove the flooring and locate the damage
Start by removing any carpet, padding, laminate, or other flooring materials covering the affected area. If the padding is saturated, it’s usually best to discard and replace it.
Once the subfloor is exposed, inspect it carefully for stains, discoloration, or areas where the odor seems strongest. Don’t be surprised if the affected area is larger than you expected—cat urine often spreads beyond the visible stain.
Vacuum away dust, dirt, and loose debris so you have a clean surface to work with.
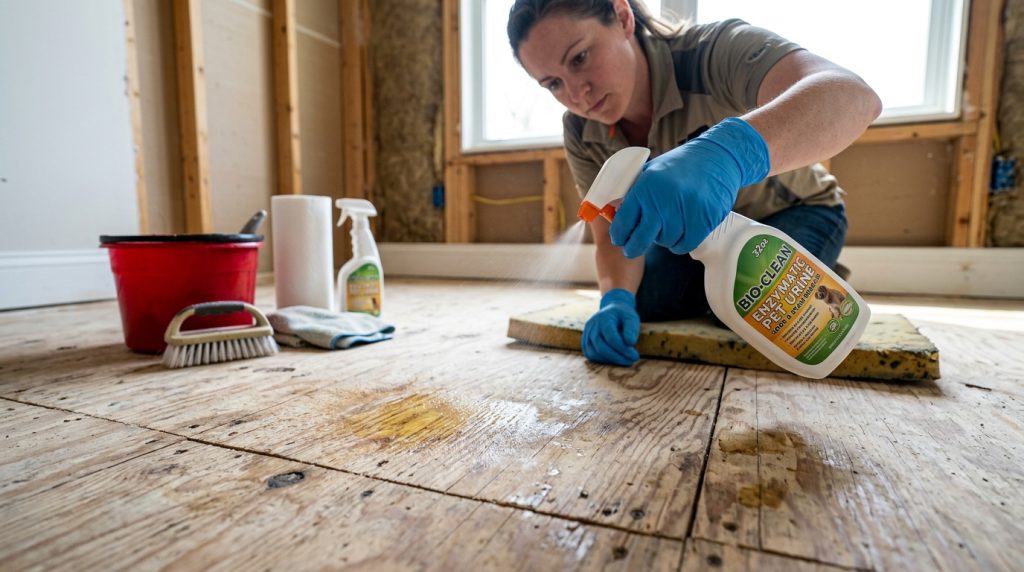
Step 2: Treat the area with an enzymatic cleaner
This is the step many homeowners skip, and it’s often why the smell returns later.
Cat urine contains uric acid crystals that can remain in the subfloor for years. Ordinary household cleaners may remove the stain, but they usually don’t break down these crystals.
Generously saturate the affected area with a high-quality enzymatic pet urine cleaner.
The goal is to let the solution penetrate as deeply as the urine did. Allow it to sit according to the manufacturer’s instructions, typically 15 to 30 minutes or longer.
Afterward, blot up any excess liquid and let the enzymes continue working.
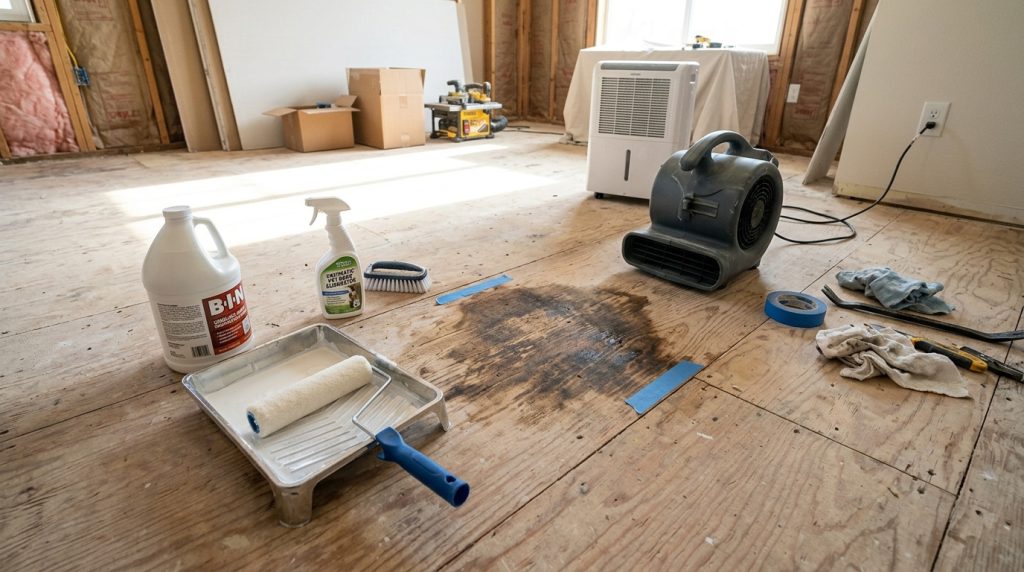
Step 3: Let the subfloor dry completely
Patience matters here.
Before applying any primer or sealant, the subfloor must be completely dry. Depending on humidity levels and the amount of cleaner used, drying can take anywhere from 24 to 48 hours.
To speed things up, place fans in the room and run a dehumidifier if possible. A dry surface helps the primer bond properly and prevents future issues with peeling or poor odor control.
Step 4: Seal the odor with the right primer
Once the subfloor is dry, it’s time to lock in any remaining odor.
Use a shellac-based or oil-based odor-blocking primer like Zinsser or KILZ, designed to seal porous surfaces. Avoid standard water-based latex primers, as they often allow odors to bleed through over time.
Apply a generous, even coat using a brush or roller. For severe contamination, a second coat—and sometimes even a third—may be necessary. Pay special attention to cracks, seams, and edges where odors can escape.
This step creates a barrier that prevents lingering urine odors from migrating back into your living space.

Step 5: Check for permanent damage
After the primer dries, take a final look at the condition of the subfloor.
If the wood is swollen, soft, warped, crumbling, or beginning to separate into layers, sealing alone may not solve the problem.
In those cases, the affected section of subfloor has likely suffered structural damage and should be cut out and replaced.
Fortunately, if the wood remains solid and the odor is gone, you can reinstall your flooring and move on without worrying about the smell returning every time the weather gets humid.
Cleaning Wooden Subflooring to Remove Cat Urine Stains
If the urine stain hasn’t caused significant damage to the wood, cleaning the subfloor thoroughly may be enough to eliminate both the stain and most of the odor.
The sooner you address the problem, the better your chances of saving the existing subfloor and avoiding costly repairs.
1. Remove the flooring and identify affected areas
Begin by removing any carpet, carpet padding, laminate, or other flooring covering the stained area.
Once the subfloor is exposed, inspect it carefully for dark spots, yellow discoloration, or areas where the urine odor is strongest.
Keep in mind that cat urine often spreads beyond the visible stain, so check the surrounding wood as well.
2. Vacuum and prepare the surface
Before applying any cleaning products, vacuum the subfloor thoroughly to remove dust, pet hair, and loose debris.
A clean surface allows the treatment solution to penetrate deeper into the wood. If there is dried residue on the surface, wipe it away with a damp cloth and allow the area to dry.
3. Saturate the wood with an enzymatic cleaner
The most effective way to get cat urine out of wood subfloor materials is by using a quality enzymatic cleaner.
Unlike ordinary household cleaners, enzyme-based products break down the uric acid crystals that cause lingering odors.
Apply the cleaner generously over the stained area and let it soak into the wood. Since the urine likely penetrated below the surface, the cleaner needs to reach the same depth to work effectively.
Follow the manufacturer’s instructions regarding dwell time before removing any excess liquid.
4. Let the subfloor dry completely
After treatment, allow the wood to dry thoroughly. Depending on humidity levels and how much cleaner was used, this may take 24 to 48 hours.
Placing fans in the room and running a dehumidifier can help speed up the process.
For homeowners looking to clean the subfloor from cat urine DIY style, patience during the drying stage is crucial.
Applying new flooring over damp wood can trap moisture and create additional problems later.
5. Inspect the results and prepare for new flooring
Once the subfloor is completely dry, check for any remaining stains or odors. If necessary, repeat the cleaning process on stubborn spots.
When the smell is gone, you can move forward with sealing the surface and installing new flooring.
This is also the ideal time to treat a plywood subfloor for urine before new carpet is installed.
Applying an odor-blocking primer after cleaning provides extra protection and helps ensure the smell doesn’t return months down the road.
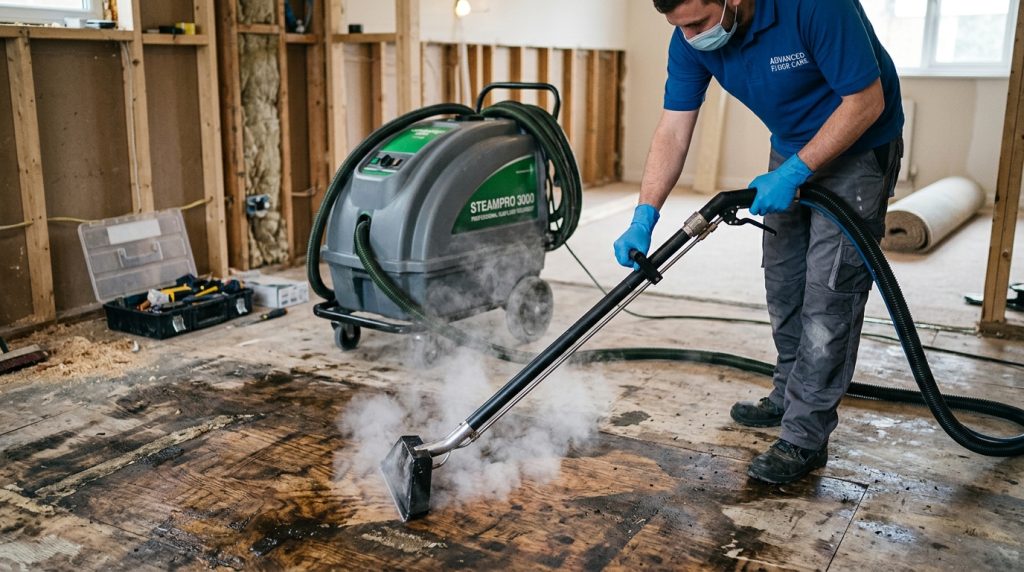
Do You Need Professional Steam Cleaning for Subfloor Treatment?
If you’ve removed the flooring, treated the urine stains, and dried the subfloor, you may be wondering whether professional steam cleaning is the next step.
While steam cleaning works well for carpets and upholstery, it’s not always the best solution for a urine-contaminated subfloor.
Why is steam cleaning not usually recommended?
Steam cleaning relies on heat and moisture to loosen dirt and stains. While this method can be effective on surface materials, it may create additional problems when used directly on wood subfloors.
The added moisture can soak into the wood, increasing drying time and potentially causing swelling, warping, or delamination.
More importantly, steam cleaning often doesn’t remove the uric acid crystals embedded deep within the wood fibers—the primary source of persistent pet urine odors.
For most pet urine problems, enzymatic cleaners remain the preferred solution. These products are designed to break down the organic compounds found in urine rather than simply masking odors.
When applied correctly, the enzymes penetrate the wood and target the source of the smell.
After the area is completely dry, an odor-blocking primer can be applied to seal any remaining contamination and prevent odors from resurfacing.
When are professional services worth it?
There are situations where hiring a professional can make sense. If the urine contamination covers a large area, has been present for years, or involves repeated accidents from multiple pets, professional restoration equipment may improve the chances of success.
Many restoration companies use industrial air movers, dehumidifiers, moisture meters, and extraction systems that can help dry and evaluate the subfloor more effectively than standard household equipment.
Signs you may need professional help:
Consider calling a professional if:
- Strong odors remain after multiple cleaning attempts.
- The subfloor feels soft, swollen, or structurally damaged.
- Mold growth is visible.
- You’re preparing the home for sale and want to ensure the odor is completely eliminated.
Removing and Replacing the Wooden Subfloor – When, Why & The Cost?
In most homes, a subfloor will last at least 20 to 30 years, and high-quality plywood or OSB subfloors can often last as long as the house itself.
That said, longevity isn’t guaranteed. Factors such as moisture, leaks, ventilation, construction quality, and regular maintenance all play a major role in determining how long a subfloor stays strong and stable.
If your cat’s urine has been left on the subfloor for too long and has seeped through cracks, the affected wood may have rotted. Don’t worry – you don’t necessarily have to replace the entire subfloor.
Instead, you can just remove the urine-soaked section and replace it with new subflooring material.
However, if the damage is too extensive and cannot be easily fixed, you may need to replace the whole subfloor, which is a substantial undertaking.
The cost of replacing a section of the subfloor can range from $500 to $2000, depending on the size of the affected area and the extent of the damage.
If, for example, only a few boards need to be replaced, it will cost less.
However, if the entire subfloor needs to be replaced, it will be more expensive. Additionally, the type of subflooring chosen affects the cost; replacing it with plywood is less expensive than replacing it with hardwood.
Related FAQs:
What is the best subfloor sealer for cat urine?
The best subfloor sealers for cat urine are shellac-based and oil-based odor-blocking primers. Products such as Zinsser B-I-N Shellac-Based Primer and KILZ Original are commonly used by flooring professionals because they create a strong barrier that locks in lingering odors and stains.
Before sealing, always clean the area with an enzymatic cleaner and allow the subfloor to dry completely. Sealing a contaminated but uncleaned surface may trap odors rather than eliminate them.
Is the subfloor ruined if it gets wet due to pet urine?
Not necessarily. In many cases, a subfloor can be cleaned, dried, and sealed successfully after exposure to pet urine. However, long-term moisture can cause wood to swell, warp, soften, or delaminate, especially in plywood and OSB subfloors.
If the wood remains structurally sound after drying, replacement is usually unnecessary. But if the subfloor feels spongy, crumbles, or shows severe deterioration, the damaged sections should be replaced.
How to pull moisture out of a subfloor due to pet urine?
Start by removing any carpet, padding, or flooring materials covering the affected area. Clean the urine contamination, then use high-powered fans to increase airflow across the subfloor.
Running a dehumidifier helps remove moisture from the surrounding air, speeding up the drying process. Depending on the severity of the contamination, drying may take 24 to 48 hours or longer. A moisture meter can help confirm that the subfloor is dry before sealing or installing new flooring.
The bottom line
Although older homes may have concrete or lumber subfloors, modern subfloors are typically made of plywood or oriented strand board (OSB).
However, it is essential to note that these materials are more vulnerable to damage from pet urine and require careful cleaning to avoid potential rotting in the future, which can be expensive to repair.
To prevent replacing the whole subfloor, attend to your cat’s urine immediately and don’t let it sit for too long. Early cleaning and treatment of the affected area should suffice without requiring subfloor replacement.
Share the post "How to Seal Cat Urine Odor in Subfloor?"

One of the greatest feelings in the world is finishing a project. Whether it be remodeling part of your house Read more

Old & Empty Paint Cans We see continuous development around the globe all the time. Due to this, you can Read more

Repainting your cabinets is a great way to give your kitchen a fresh, newer look. However, there is a deceptive Read more

Painting your home can be a great relaxation and fun for DIYers. Yes, it's wonderful - until you spill some Read more

Jack Luis is a semi-retired painter who loved painting his clients’ ideas on their walls.
He had worked as a painter for over a decade serving customers in areas such as Charleston, Mount Pleasant, Beaufort, and Georgetown, SC (South Carolina). Today in his free time, he likes to read and write about the newer techniques implemented in his profession. You may read more about him here or get in touch with him here.