

Before being banned in the late 1970s, lead was a common additive to paints that helped make them more durable and long-lasting.
Its ability to look fresh, dry quickly, and its resilience to moisture made lead paint highly desirable until its harmful health properties were fully appreciated.
And while lead paint has not been used in decades, it still exists in many homes that were built before 1978.
While many such homes have had the lead paint removed, it may still be present underneath more recent coatings of non-lead-based paints.
Although short-term exposure to a minimal amount of lead is generally nothing to worry about. But unfortunately, long-term exposure may have dire consequences for you and your family.
What this means is if you are moving into an older home, a home old enough to have used lead-based paints, then you should have it tested first.
How Do You Test Paint for Lead?
You can do the DIY lead paint test yourself with an EPA-approved lead paint testing kit.
These lead paint testing kits are not cheap, but they are far less expensive compared to hiring a professional to do the job. Using them, you can do the testing yourself at home, and if further verification is needed, hiring a pro is recommended.
Here’s a clean, no-nonsense approach—with just enough technical detail to keep things accurate.
1. Choose the right testing kit
Remember that not all lead tests are created equal.
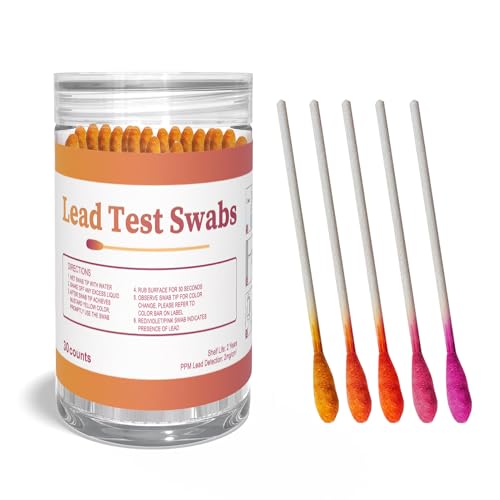
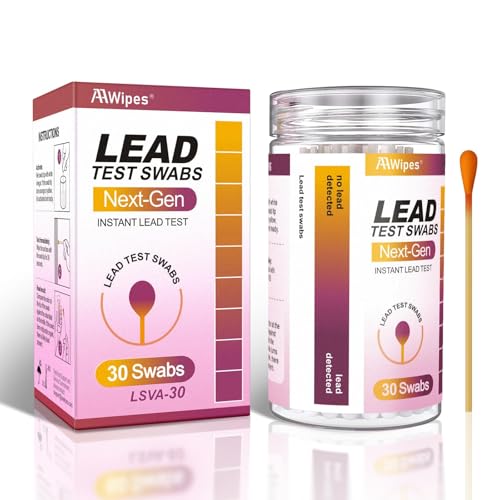
Rhodizonate-based kits are ideal for light-colored paints. They react strongly with lead salts and are highly sensitive—but there’s a catch.
These swabs also turn red when they touch red or pink paint, which can lead to false positives.
Sulfide-based kits work better for red or pink paints, as they react with lead to form dark grey or black lead sulfide.
However, they’re unreliable on very dark surfaces because the color change can be hard to distinguish.
If you’re testing a deep or dark red paint, read the instructions carefully—or consult a professional—to avoid misinterpreting the results.

*Last update on 2026-03-30 / Affiliate links / Images from Amazon Product Advertising API
2. Prepare safely
You’ll need a sharp utility blade to expose the paint layers. Gloves are optional, but smart.
While intact lead paint is relatively stable, it becomes hazardous when it flakes or turns into dust—especially if ingested.
Ventilate the room well, and keep children and pets well away during testing.
3. Test the right locations
Focus on areas that are more likely to contain older paint layers or experience wear, such as walls, furniture, windowsills, baseboards, etc.
It’s advisable to always choose a thicker paint area, where multiple layers are likely present.
4. Perform the test correctly
Make a small incision—about ¼ inch deep—to cut through all paint layers down to the substrate.
This step is critical; testing only the surface layer can give misleading results.
Activate the swab according to the kit instructions, then press the soft tip firmly into the cut so it contacts every layer. Hold it in place for the specified time (usually a few seconds).
5. Interpret—and verify—the results
- Rhodizonate swabs turn red in the presence of lead (and unfortunately, red paint).
- Sulfide swabs turn black or dark grey when they react with lead (and also when touching dark paint).
Because of these limitations, repeat the test with a fresh swab, even if the first result seems clear. Consistent results matter more than speed.
It’s recommended to test twice, everywhere. Most swabs come back clear, indicating no detectable lead.
Still, test each area at least two times to ensure reliable coverage and reduce the risk of false readings.
How much does it cost to test for lead paint?
DIY Lead-paint testing kits vary in cost, but they are usually well under $25. You can find the right one for around $10 to $20 that best suits the color of paint in your home for the most accurate result.
Hiring a professional will cost considerably more money (usually around $25 to $100), but they will often use the same types of kits more than once.
7-Step Plan for Positive Lead-Based Paint Results
Finding lead-based paint in your home can feel alarming—but it doesn’t have to be.
With the right information, proper tools, and a calm, methodical approach, you can manage the risk safely and intelligently.
Whether you plan to remediate, encapsulate, or simply monitor the situation, this 7-step plan will help you make technically sound and health-conscious decisions.
Step 1: Use the Right Lead Test
Many inexpensive kits on the market can produce false positives or false negatives.
To minimize guesswork, always choose an EPA-recognized lead test kit. And for best practice:
- Test the same spot at least twice using fresh swabs.
- Cut deep enough to reach all paint layers, not just the surface coat.
- If results are inconsistent, err on the side of caution and assume lead is present until professionally confirmed.
Step 2: Confirm Results Through the EPA
If your tests indicate lead, the next move is verification—not panic.
The EPA recommends:
- Hiring a certified lead inspector or risk assessor
- Reviewing their written inspection or risk assessment report
- Using only EPA-certified contractors for removal or stabilization
Professional inspectors use XRF analyzers and lab testing, which are significantly more accurate than consumer kits.
Step 3: Consider Health Screening (If the Home Is Occupied)
If you haven’t moved in yet, you’re in the clear for now.
But if your family has already been living in the home—especially children or pregnant individuals—blood lead level (BLL) testing is strongly recommended.
Early detection matters. Lead exposure is cumulative, and prompt medical intervention significantly reduces long-term health risks.
Step 4: Assess the Condition—Not All Lead Paint Is Dangerous
Here’s the technical truth many homeowners miss: Lead paint is only hazardous when it’s deteriorating.
If the paint is:
- Intact
- Well-bonded
- Not chipping, flaking, or generating dust
…it poses minimal immediate risk.
The danger arises when friction, moisture, or age causes the paint to break down and release microscopic lead particles into the air.
Step 5: Safely Remove Lead Paint (When Removal Is Necessary)
If paint is peeling or failing, controlled removal is essential. Safest removal options include:
- Chemical paint strippers (low-temperature, low-dust)
- Heat guns (used carefully below 1100°F to avoid lead fumes)
- Professional dip stripping for doors, windows, and removable components
Commercial stripping facilities remove paint using controlled chemical baths—more expensive, yes, but exceptionally safe and thorough.

Step 6: Encapsulation—Painting Over Lead the Right Way
Yes, you can paint over lead paint safely—if it’s in good condition. This method is called encapsulation, and it’s often the most practical solution.
Encapsulation works by sealing lead paint under a durable, flexible barrier that prevents dust or fumes from escaping.
But remember, regular paints, primers, varnishes, polyurethane, or shellac are not sufficient. Use lead-specific encapsulating coatings, which are thicker and engineered to bond permanently.
Trusted brands include: Benjamin Moore, Sherwin-Williams, LEADX™, Fiberlock, and a few others.
When applied correctly, encapsulants can last 15–20 years, depending on surface wear and environment.
Encapsulants vary by formulation. Surface prep, drying times, and film thickness matter. Most manufacturers also advise against encapsulating:
- Severely deteriorated surfaces
- High-friction areas like floors and stair treads
These areas should be fully stripped instead.
Step 7: Follow Safety and Cleanup Protocols—No Shortcuts
Encapsulation still requires strict safety controls.
Always:
- Keep children, pets, and seniors away from the work area
- Seal floors with taped drop cloths
- Wear gloves, protective clothing, and a respirator rated for lead particles
Never:
- Sand, scrape, or dry-strip lead paint
- Pressure wash lead-painted surfaces
After the job:
- Dispose of drop cloths, tape, rags, and PPE immediately
- Vacuum thoroughly using a HEPA vacuum
- Run a HEPA air purifier to capture residual airborne particles
HEPA filtration is critical—it can trap particles as small as 0.3 microns, including invisible lead dust that standard vacuums simply recirculate.

Should You Buy or Rent an Older Home That May Contain Lead Paint?
Older homes have charm, character—and sometimes, legacy building materials that need careful handling. Lead-based paint is one of them.
The presence of lead paint doesn’t automatically make a home unlivable, but it does mean you need to proceed with clarity, caution, and the right safeguards.
Frankly speaking, living in a home with deteriorating lead-based paint is not safe, especially for the sensitive skin of children and pregnant individuals.
That’s why, if you’re considering purchasing an older property (typically built before 1978), lead testing should be non-negotiable.
Ideally:
- Request a lead inspection or risk assessment before finalizing the contract
- Make it a pre-purchase condition, placing responsibility on the seller rather than inheriting the problem later
A certified lead inspector can not only confirm the presence of lead but also recommend whether removal, encapsulation, or ongoing maintenance is the most practical solution.
Always review the written inspection report carefully and follow the assessor’s recommendations. In some cases, full removal may be impractical or cost-prohibitive.
When that happens, inspectors typically provide long-term maintenance and sealing guidelines that allow the home to remain safe through proper encapsulation and monitoring.
In short: buying an older home with lead paint isn’t necessarily a deal-breaker—but buying one blindly is.
Should you rent an apartment with lead paint?
Renting a property with lead paint is generally not ideal, but it may be acceptable under controlled conditions.
If you’re considering it:
- Confirm that the paint is intact, stable, and not peeling
- Ensure the surfaces can be safely repainted or encapsulated before move-in
- Avoid properties with visible chipping, friction surfaces, or poor maintenance
Importantly, landlords are not automatically required to remove lead paint from rental properties. However, they are legally required to disclose the presence of known lead-based paint.
This disclosure must be:
- Provided before lease signing
- Clearly stated in the written lease agreement, along with an EPA-approved lead hazard pamphlet
If there’s no disclosure, that’s a serious violation. And under specific circumstances, a landlord can be sued for lead paint.
If you were not informed about lead-based paint and later suspect exposure, you have the right to request a lead hazard inspection. If the results confirm lead hazards:
- You may legally terminate the lease
- You may pursue legal action if lead exposure caused health issues or damages
Failure to disclose lead-based paint can result in significant penalties for landlords, with fines that can reach $19,500 or more per violation, depending on jurisdiction and severity.
The bottom line
Lead-based paint doesn’t demand panic—it demands precision. Whether you choose professional removal or long-term encapsulation, following EPA-backed procedures protects both your home and your health.
This means you will need to test paint chips for lead paint in different rooms to ensure full coverage. It’s good to even test the old wooden toys in your kids’ room if they are stained or painted with old paint.
Done correctly, lead management is not only safe—it’s sustainable, cost-effective, and smart.
Share the post "How to Test Paint for Lead (DIY Tip)"

Your basement is the perfect spot for building rooms you may not want in the main house. These may include Read more

Drywall is basically a panel composed of calcium sulfate dihydrate or gypsum. Other names include plasterboard, wallboard, sheetrock, gypsum board, Read more

Repainting the wooden window frames of your house is like putting on a nice, new summer dress after a long, Read more

While brushes and rollers are the traditional means of painting walls, spray paint is coming more in favor. For many Read more

Jack Luis is a semi-retired painter who loved painting his clients’ ideas on their walls.
He had worked as a painter for over a decade serving customers in areas such as Charleston, Mount Pleasant, Beaufort, and Georgetown, SC (South Carolina). Today in his free time, he likes to read and write about the newer techniques implemented in his profession. You may read more about him here or get in touch with him here.