

Many people still remember their first experience with chalk as a child.
The excitement of playing with the many different colors of the chalk, as well as drawing animals, people, and hopscotch courts, was infectious for many of us.
And even as an adult, chalk is still an exciting medium of art to create with, whether as a formal artist or with the little ones in your life.
Thankfully, the DIY chalk paint recipe has come up as a fun way for many people to play with chalk (indoors and outdoors), as well as to create a fresh and vintage look in just one application.
The best part is that with just a little baking soda and some regular paint, you can whip up your own homemade chalk paint that’s just as creamy, durable, and budget-friendly. Let’s roll up those sleeves and bring some charm (and chalky magic) into your home.
Why Make Your Own Chalk Paint?
There are plenty of good reasons to make your own chalk paint instead of grabbing a pricey can off the shelf.
First, it’s incredibly cost-effective — store-bought chalk paints can be surprisingly expensive, while a DIY version costs just a fraction using ingredients you probably already have (like baking soda and leftover latex paint).
Second, making it yourself gives you full control over texture, thickness, and color — no more settling for “almost right” shades. You can customize the consistency to suit furniture, walls, decorative accents, or experiment with DIY art.
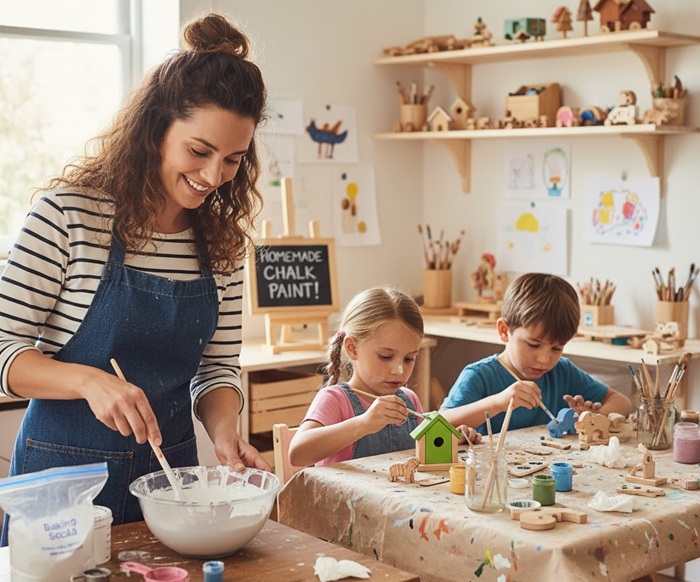
And finally, it’s fun and kid-friendly. perfect for small craft projects when you don’t want to invest in expensive paint sets. Children can join in the creative mess without you worrying about wasting costly materials.
So, whether you’re a weekend DIYer or a parent with a few imaginative little helpers, homemade chalk paint is the perfect mix of creativity, control, and cost savings.
In short, homemade versions of making chalk paint with baking soda and other additives aren’t just cheaper — it’s creative freedom in a jar.
DIY Chalk Paint Recipe with Baking Soda
What you’ll need:
- 1 cup of latex or acrylic paint (any color you like)
- 2–3 tablespoons of baking soda
- A small mixing bowl or container
- A stir stick or spoon
- Paintbrush or roller
Step-by-Step Instructions:
Step 1: Measure and Pour the Paint
Start by pouring about one cup of your chosen paint into a clean, dry container or mixing bowl. It’s best to use latex or acrylic paint — they blend well with baking soda and dry to a smooth, durable finish.
If you’re aiming for that classic chalky, velvety look, go with a matte or eggshell finish instead of glossy paint. Glossy paints can resist the baking soda mixture, making it harder to achieve that soft, vintage texture.
You can choose any color you like — from bold statement hues to subtle neutrals. If you’re painting furniture, lighter shades often highlight the chalk finish beautifully.
Make sure the container is large enough for stirring without splashing, as the mixture thickens quickly once the baking soda is added.
Step 2: Add the Baking Soda and Mix Thoroughly
Add 2 to 3 tablespoons of baking soda to the paint. The more you add, the chalkier and thicker the finish will be.
Stir the mixture slowly and consistently until the texture becomes smooth and creamy — kind of like yogurt, making sure there are no lumps.
If the baking soda is refusing to blend, add a few drops more of water. You can also use an electric blender, mixer, or drill to help speed up the process. You should end up with a thick, wet mass of baking soda.
If you’re still struggling with chunks in the ingredients, you can spoon the mixture into a plastic bag and massage it with your hands to ensure there are no thick lumps hiding inside the material.
Step 3: Test and Apply the Paint
Before diving into your main project, it’s smart to test your chalk paint mixture on a small, hidden surface — like the back or underside of the furniture. This quick check helps you gauge the consistency, coverage, and finish before committing.
If the paint feels too thick or pasty, add a small splash of water or extra paint and stir again until smooth. On the other hand, if it feels too thin or streaky, mix in a pinch more baking soda to thicken it slightly. The goal is a creamy, spreadable texture that glides easily onto the surface without clumping.
Once it’s ready, apply the paint evenly using a soft brush or roller. Start with a thin first coat — it dries faster and adheres better. Most surfaces will need two coats for that signature, velvety chalk finish. Allow each coat to dry for 30–45 minutes before applying the next one.
For a more rustic or distressed look, lightly sand the edges after the final coat — that’s where the real vintage charm starts to show.
Can you make the chalky finish paint with just baking soda and water?
Technically, yes — you can make a chalky-style paint using just baking soda and water, but it won’t perform like true chalk paint. Here’s the deal:
When you mix baking soda with water, you get a thick, chalky paste that can be brushed onto surfaces. It’ll give a matte, textured look, which works fine for temporary crafts, kids’ art projects, or small decorative pieces (like mason jars or cardboard).
However, this simple mix lacks the binding power that real paint provides. Without a paint base, it doesn’t adhere well to wood, metal, or plastic and will easily flake off once dry.
If you’re after a durable, furniture-ready finish, stick with baking soda + latex paint. But if you just want an easy, budget-friendly craft paint for kids or quick decor, the baking soda and water combo is a fun, low-cost alternative — just don’t expect it to last forever.
Quick Tip: Homemade chalk paint doesn’t have a long shelf life. It begins to dry and thicken quickly, so mix only as much as you plan to use within the day.
How to Make a DIY Chalk Paint without Baking Soda?
For some people, baking soda can irritate the skin.
So, if you do not want to use baking soda for preparing a homemade chalk paint, there are two other popular methods (and a few simple additives) you can use.
And the good thing is you can find most of these materials at your local hardware store and mix them up in small or large batches, depending on the size and space of your project.
Each of these HMCP recipes (homemade chalk paint) will let you apply the paint smoothly, dry quickly, and sand easily in order to provide a distressed, textured, and stylish look all year round.
Making Chalk Paint with Plaster of Paris
Preparing chalk paint using Plaster of Paris is straightforward. Here are the things you will require and the steps you should follow…
Ingredients needed:
- 1 cup of Latex Paint
- 1 ½ Tablespoon of Water
- 2 ½ Tablespoons of Plaster of Paris
Procedure and steps to follow:
Begin by mixing the Plaster of Paris with the water and stirring evenly with a spoon or paint stick, mixing thoroughly until all lumps have been dissolved.
You should end up with a thicker paste that has a consistency akin to wet sand.
Next, take the mixture and pour it directly into the paint. Stir until the paste has dissolved into the paint and pours smoothly off the end of your stirrer.
Your paint should not look any different than when you begin, but you’ll notice the chalk difference upon application.
You can create a quart of paint by quadrupling the ingredients and following the same mixing recipe.
But be aware that chalk paint tends to dry out more rapidly than other materials due to the higher-than-average amount of dry or chalk contents inside the liquid material.
2- Making Chalk Paint Using Unsanded Grout
If you want to make chalk paint without Plaster of Paris and baking soda, this is the method that can work.
Here are the things you will need and the process to follow…
Ingredients needed:
- 1 Tablespoon Cold Water
- 1 Cup Latex Paint
- 2 Tablespoons of Unsanded Grout (available at hardware stores in the tile department)
Procedure and steps to follow:
For this recipe, you’ll begin by mixing in the grout and cold water until they run evenly and smoothly together with no chunks or other disturbances in the consistency of the product.
Keep in mind that mixing your own unsanded grout mixture requires a good amount of arm work. So, you can beat out any lumps with a stirring device or kitchen whisk to help smooth out any other inconsistencies in your mixture.
Next, you’ll need to blend the grout mix with your latex paint. Beat smoothly until all your paint drips out smoothly and does not clump or run.
Apply quickly so your paint does not dry out, and allow it to dry evenly in order to obtain the perfect distressed chalk paint patina.

Tips for Applying Your New Homemade Chalk Paint to Your Project
One of the biggest perks of a DIY chalk paint recipe is its versatility — it sticks to almost anything (wood, metal, glass, and even laminate) without the usual prep work.
No need for sanding, stripping, or priming; just give your surface a quick wipe to remove dust and grease, then dive right in.
Here are a few tips and suggestions for applying your homemade chalk paint like a pro:
- When applying, use a high-quality synthetic brush or a smooth foam roller for clean, even coats.
- If you prefer a more rustic, distressed finish, grab an inexpensive dry brush — the uneven strokes add character and charm.
- For a smoother texture, apply two light coats rather than one thick layer, allowing each to dry fully before adding the next.
Do you need to seal and protect the homemade chalk paint formula on the project?
Yes — sealing your homemade chalk paint is highly recommended if you want your project to last. So, once your project looks perfect, finish it by sealing the chalk paint properly and protecting your finish.
Start by lightly sanding the surface with 220-grit sandpaper to smooth any brush marks.
You can then apply a protective topcoat — either clear wax for that soft, velvety sheen or matte polyurethane/acrylic sealer for a tougher, more durable layer.
Wax gives you that classic chalk-paint patina that can be buffed to a gentle glow, while sealers offer extra resistance to moisture, stains, and scratches, ideal for furniture or high-use areas.
Whichever route you choose, sealing ensures your homemade chalk paint finish stays as charming and resilient as the day you brushed it on.
The bottom line
Making your own chalk paint with baking soda is more than just a budget-friendly hack — it’s a creative, satisfying way to transform ordinary pieces into charming, one-of-a-kind décor.
Whether you’re upcycling old furniture, personalizing home accents, or crafting with your kids, this simple DIY formula gives you professional-looking results without the hefty price tag.
The best part is you control everything — from color and consistency to finish and texture. With a bit of patience and sealing, your homemade chalk paint can look every bit as good as store-bought brands.
It’s proof that a little ingenuity (and a spoonful of baking soda) can go a long way in reviving your home’s personality. So, grab that brush, mix your magic potion, and let your creativity flow — one chalky masterpiece at a time.
Share the post "Easy Homemade Chalk Paint (Using Baking Soda)"

With Radon warnings and sealers out there, it can send your head into a spin about whether this is all Read more

We all love MDF for our various projects, including furniture and cabinets. After all, it's cost-effective compared to other wood Read more

For those who want their walls to have a unique appearance, glow-in-the-dark paint is one way to express creativity. As Read more

For over two hundred years, the Valspar brand has been associated with quality. Starting in 1806, the company grew into Read more

Jack Luis is a semi-retired painter who loved painting his clients’ ideas on their walls.
He had worked as a painter for over a decade serving customers in areas such as Charleston, Mount Pleasant, Beaufort, and Georgetown, SC (South Carolina). Today in his free time, he likes to read and write about the newer techniques implemented in his profession. You may read more about him here or get in touch with him here.