

Taking the baby’s first footprints and handprints is a traditional way to preserve them as a keepsake for many parents.
Mainly in Asian countries like India and China, it’s a widespread belief that these prints will bring good luck and fortune to the family.
With time, this tradition is getting even more popular in Western countries like the US and the UK.
In this article, I will cover a few exciting ways to take your baby’s first prints as a keepsake, along with all the safety concerns you need to consider when choosing the inks, paints, or other products.
So, if you feel excited as a to-be parent, get ready to welcome your fortunate child to this new world.
5 Ways to Get Safe Baby Handprints (Without Paint)
Capturing those tiny creases and miniature fingers and toes is a rite of passage for every parent, but it shouldn’t feel like a high-stakes chemistry experiment.
While we all want that perfect stamped footprint in a frame, the goal is a memory, not a dermatological appointment.
If you are wary of standard dyes, here are five sophisticated (and slightly crafty) ways to secure those hand and footprint baby keepsakes without the typical mess.
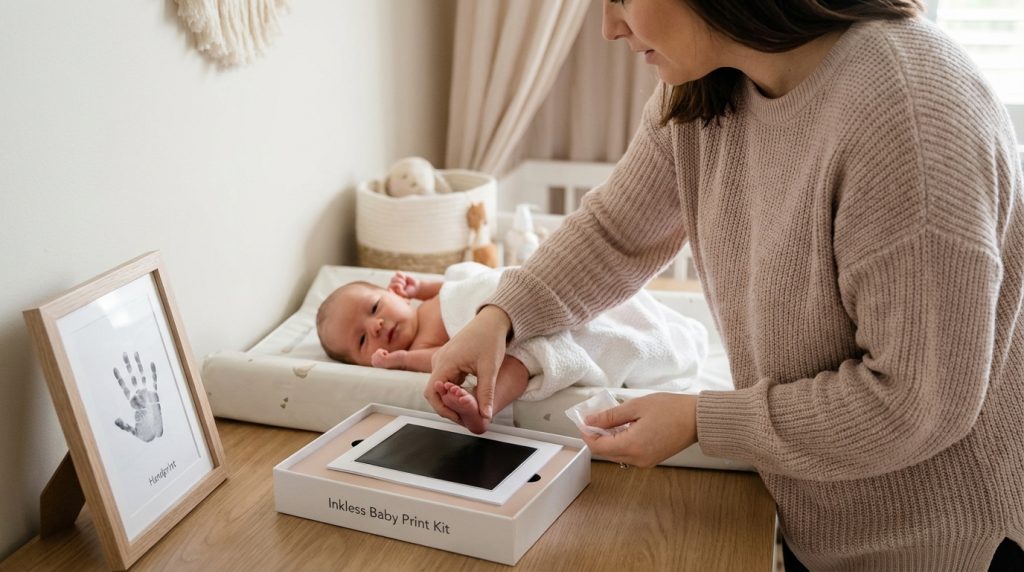
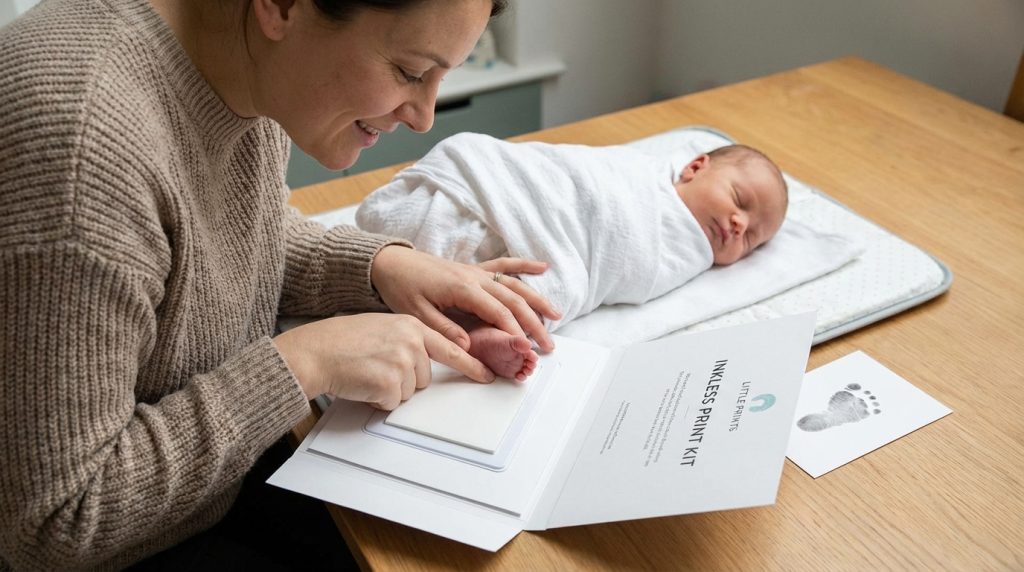
1. The Magic of Inkless Technology
If you want professional results without actually touching your baby’s skin with pigment, an inkless hand and footprint kit is the gold standard.
These kits use a specialized “mess-free” system where a clear solution is applied via a wipe, which then reacts chemically only with the sensitized paper provided.
- Zero Residue: No scrubbing “Newborn Navy” off tiny cuticles for three days.
- Technical Precision: Captures fine dermatoglyphic details (the ridges of the skin) better than thick paints.
- Safety: Most inkless footprints for newborns are used in hospitals globally because they are non-toxic and acid-free.


*Last update on 2026-03-30 / Affiliate links / Images from Amazon Product Advertising API
2. Natural Pigments: Henna and Turmeric
For a touch of tradition and a dash of antiseptic properties, look to your spice cabinet.
Using organic henna (Mehendi) or turmeric creates a beautiful, earthy baby’s first footprint.
In many cultures, these aren’t just colors; they are considered auspicious blessings for the child’s journey.
- Skin Benefits: Turmeric contains curcumin, known for its anti-inflammatory properties.
- Longevity: Henna provides a long-lasting “stain” on the paper (and the baby!), so be prepared for a temporary orange-tinted foot.
- Organic Sourcing: Ensure you use 100% pure powders to avoid synthetic PPD (paraphenylenediamine) often found in “black henna.”
3. Kitchen Chemistry: Flour and Food-Grade Dyes
Why buy it when you can cook it?
You can create a suspension using common pantry staples.
By mixing a polymer base (flour or cornstarch) with a solvent (water), you create a thick, tactile medium that mimics professional “finger paint” but remains entirely edible—perfect for babies who think their toes are snacks.
- Recipe: 1 cup cornstarch + 1 cup cold water + food-grade coloring.
- Texture Control: You can adjust the viscosity; a thicker paste works best for high-contrast baby-safe ink for handprints.
- Biodegradable: Completely eco-friendly and easy to compost if the “art” doesn’t go as planned.
4. The “Dusting” Method: Coffee and Powder
If you prefer a vintage or minimalist aesthetic, skip the liquids entirely.
This method uses fine particulates to create a soft-focus impression. It’s essentially the forensic science version of baby art.
- The Medium: Fine-ground coffee (for a sepia, “aged” look) or cornstarch-based baby powder (for a ghostly white print on dark cardstock).
- The Technique: Lightly coat the foot, press firmly onto the paper, and then use a “fixative” (like a light mist of hairspray) once the baby is out of the room to keep the dust from smudging.
- Sensory Friendly: Great for babies who are sensitive to the “wet” feeling of paints or inks.
5. 3D Castings and Non-Toxic Clays
Sometimes 2D isn’t enough to capture the sheer “chunk” of a baby’s hand.
An inkless handprint and footprint baby kit often includes air-dry clay.
These are typically composed of calcium carbonate and synthetic binders that don’t require kiln firing.
- No Irritation: Unlike traditional plaster of Paris, which can be exothermic (heats up) as it sets, modern “soft clay” is cool to the touch.
- Mistake-Proof: If the baby wiggles, you can simply knead the clay and start over—a luxury you don’t get with ink.
- Depth: Provides a tactile record of the actual size and scale of the hand.
What kind of sealer do I need to put on baby footprints of clay?
To preserve those tiny details in clay, you need a non-toxic, non-yellowing acrylic sealer. For a natural look, a matte spray sealant protects against moisture and dust without the artificial shine.
If you prefer a polished, “ceramic” finish, a glossy UV-resistant varnish will make the ridges pop and prevent the clay from fading over time.
Pro-Tip: Ensure the clay is 100% bone-dry (usually 24–48 hours) before sealing to avoid trapping moisture, which can cause cracking or mold.
What’s the Tradition Behind Baby’s Footprints?
For those who don’t know, I would start the topic by briefly introducing the tradition.
Its often believed that taking the first footprints of your newborn child will bring good luck and fortune to the family.
In fact, in countries like India, many people believe that the first footprint of a newborn girl child is believed to be a sign of goddess Laxmi’s blessings.
If you keep this stamping on a piece of gold or silver and worship it, your family will never face poverty.
In China and many other Asian countries, it’s believed that if you take this stamping on paper and keep it in your wallet, it will bring good luck and fortune.
Another popular belief is that if you take the first impression of your baby’s foot on a piece of paper and keep it under your pillow, you will have sweet dreams.
How long will the baby’s footprint last?
The length of time that the footprint will last will depend on the type of paper, the ink/paint you use, and the storage method you will use to preserve it.
If you want the footprint to last a long time, I recommend using thicker paper, such as cardstock, and ink/paint designed to be permanent.
Thinner papers, such as tissue paper or construction paper, will not last as long but can still be used if you’re looking for a more temporary keepsake with baby paint.
How to Take Baby’s First Footprints with Baby-Safe Ink?
The most common way to take the first footprints of your baby girl or boy is to use baby-safe ink on paper.
Avoid using any kind of scented or perfumed products on your baby’s skin, as they may cause irritation.
If you can’t find them in the market, you can make your own baby-safe ink at home. All you will need is a non-toxic black or blue ink pad and a white piece of paper to get the stamping.
When you are ready, here are the steps to follow…
Step 1- Clean Yourself
First and foremost, wash your hands thoroughly with soap and water. Dry them with a soft cotton towel.
Also, if possible, change your clothes and wear something that will be comfortable for your baby upon touch.
You may need to sit on the floor or ground with your baby in your lap to take the prints, so dress accordingly.
Step 2- Settle Your Baby Comfortably and Clean
It’s important during the project that your baby is comfortable and not crying or squirming around.
To make things easier, it’s good to take help from another person in your family.
Once your baby is settled, wipe your baby’s feet and hands with a soft, damp cloth or baby-safe wipes to remove any dirt, milk, or food, as they may interfere with the ink.
Step 3- Press the Ink Pad Gently Against Your Baby’s Foot
Now, take the non-toxic mess-free ink pad in your hand and gently press it against your baby’s foot – be extra careful here as you don’t want to hurt your baby.
If your infant feels uncomfortable during the process, pick him/her up and try again later (maybe when your baby is sleeping).
Remember that your newborn may have sensitive skin that’s prone to rashes and allergies. So, it’s always better to do a patch test before using any ink or paint on your baby’s skin.
Step 4- Place the Paper on a Flat Surface and Imprint
Next, place the piece of blank white paper on a flat surface and gently press your baby’s foot on it.
Ensure that you use premium quality paper so that the footprint you receive is clear and doesn’t fade away with time.
You can take multiple prints of your baby’s foot on the same piece of paper. Or, if you want, take the prints on multiple papers just in case the original one gets lost or damaged.
Step 5- Clean up the Foot and Hands of Your Baby
Using a baby wipe or a soft, damp cloth, clean the foot and hands of your baby to remove all the ink and residues.
Pay special attention to parts like between kids’ toes. The black ink you used may get stuck there and be difficult to remove later after it gets dried.
After cleaning, use a cotton ball dipped in baby oil to moisturize your baby’s skin. Also, don’t forget to wash your hands thoroughly with soap and water once you are done.
Step 6- Hang the Print to Dry Completely
Once you have taken the hand and footprints, hang the paper using clothespins or paper clips for an entire day.
You will need to make sure that the paper is completely dry before getting it laminated, framed, or stored.
When storing it’s astute to label the paper with all the important information like your baby’s name, date of birth, time of taking the print, etc.
This will help you to look back at the memories and cherish them for years to come.
Step 7- Store and Preserve Your Baby’s Foot Prints
If you plan to laminate the paper use a laminator, self-sealing laminating pouches, or a ziplock bag. Then preserve the paper in a safe place, out of reach of your baby or other family members.
Laminating and glass framing the print using a readily available picture frame and hanging it on the wall is also a great idea.
This will also protect it from moisture, dust, and other elements that may damage it.
You can also consider scanning the print to keep a digital copy on your computer or hard drive.
Over time, the original paper copies may be deleted, destroyed, or fade – you will never lose your digital copy if you have one.
If you feel like displaying it, you can also use a digital picture frame or a shadow box frame to keep the print on your bedside while still allowing you to see and cherish it every day.
But be careful that your baby or other family members don’t harm the frame since they might break it if easily accessible.
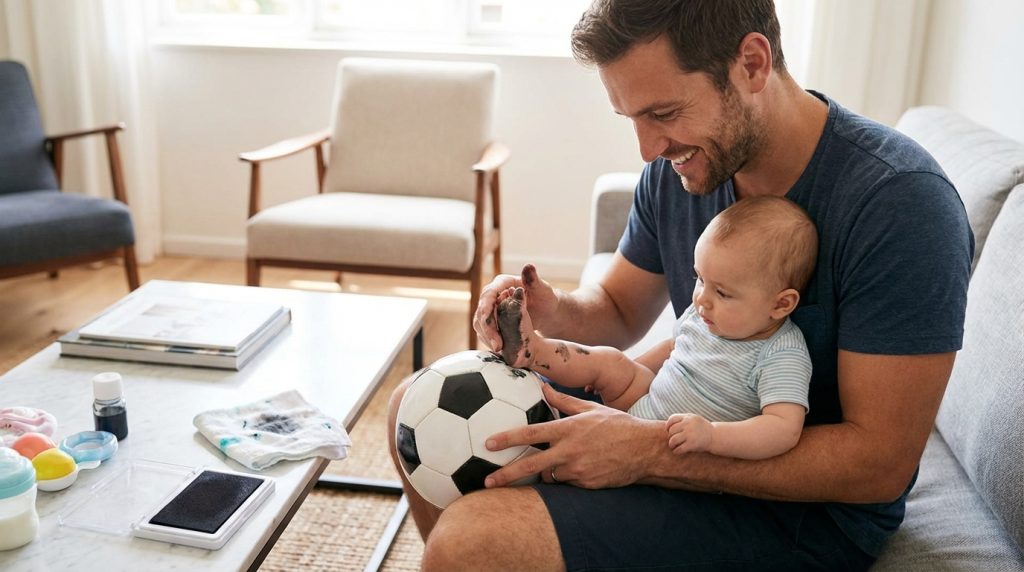
How to Get Babies Foot and Hand Print on a Soccer Ball?
For many sports-loving families, a stamped footprint in a frame feels a bit too “stationary.”
Parents often choose to capture a baby’s first footprint on a soccer ball to symbolize the start of a new “teammate’s” journey or to create a high-contrast, sculptural piece of decor for a nursery.
It’s a dynamic way to merge a family passion with a milestone, turning a standard piece of athletic gear into a one-of-a-kind heirloom.
However, printing on a sphere is a bit like performing surgery on a moving target. Here is how to master the technique:
The “Rolling” Method for Curved Surfaces
Unlike flat paper, a soccer ball has a fixed curvature that resists a standard “stamp” motion.
If you simply press the foot down, you’ll only capture the center of the sole, leaving the toes and heel as blurry smears.
To get a crisp hand and footprint baby keepsake, you must employ a “rolling” motion.
Steady the “Subject”: It is significantly easier to move the ball than the baby. Have a partner hold the baby’s leg firmly but gently, extending the foot.
The Contact Point: Start by touching the heel of the ball to the baby’s heel, then slowly rotate the ball upward toward the toes in one continuous, fluid motion.
Ink Choice: Use a high-tack, washable ink for baby handprints. You want an ink with high “grab” so it sticks to the synthetic leather (polyurethane) immediately upon contact without sliding.
Additional Tips for Technical Finishing and Longevity
Soccer balls are typically made of non-porous synthetic materials, meaning the ink sits on top of the surface rather than soaking in.
This makes the print incredibly vulnerable to smudging or flaking.
Degreasing: Before you begin, wipe the specific panel of the ball with a bit of rubbing alcohol to remove factory oils; this ensures the washable ink for baby handprints actually bonds to the surface.
Flexible Sealing: Because soccer balls are pressurized, they subtly expand and contract with temperature changes. You must apply a clear, flexible acrylic sealer (specifically one labeled “non-yellowing”) over the print.
Avoid Cracking: A rigid spray might crack as the ball “breathes,” so look for a sealant designed for leather or vinyl to keep that baby’s first footprint intact for the long haul.

First Footprints of Newborns: The Traditional “Paint” Options
If you’ve decided to go the traditional route, don’t just grab any stray acrylic tube from the craft drawer.
Standard craft paints often contain pigments or preservatives not intended for skin contact, and they can be a nightmare to scrub off a wiggly infant.
For a successful baby first footprint, you need formulas specifically engineered for skin-to-paper transfer and a quick “lift” during cleanup.
1. Washable Tempera Paint
Tempera is the gold standard for early childhood art because it is water-based and typically allergen-free.
High-quality versions feature a non-settling formula, meaning the pigment remains evenly suspended in the binder rather than clumping at the bottom.
This ensures that when you press that tiny heel down, you get a solid, opaque block of color rather than a watery smear.
- Safety Profile: Look for the AP (Approved Product) seal, which certifies the material is non-toxic even if a stray finger finds its way into a mouth.
- Consistency: It has a creamy viscosity that fills the deep creases of a newborn’s foot, making it ideal for high-contrast hand and footprint baby keepsakes.
- Cleanup: Since it’s water-soluble, a damp cloth or a quick dip in the sink dissolves the binder instantly.
2. Specialized Washable Ink Pads
For those who want the look of a stamped footprint in a frame without the gloopy texture of paint, specialized ink pads are the way to go.
Unlike standard office ink, washable ink for baby handprints is formulated with a higher water content and lower acidity to protect delicate skin barriers.
- Precision: Felt pads provide a thin, even layer of pigment that captures fine dermatoglyphic details—the tiny ridges and “fingerprints”—that thick paint might fill in.
- Acid-Free: This is a technical must-have; acid-free inks won’t yellow or degrade the paper over the next fifty years, ensuring the memory stays crisp.
- The “Wipe” Test: These inks are engineered to be “stain-resistant” on skin, meaning they are designed to be lifted away with a single baby wipe before they have a chance to set.
3. Chalk Art (The Low-Tech Hero)
If you’re looking for the absolute lowest chemical footprint, sidewalk or chalkboard chalk is your best friend.
By rubbing a high-quality, dust-free chalk directly onto the baby’s sole, you create a dry pigment layer that transfers beautifully to textured surfaces like black construction paper or cardstock.
- Zero Dry Time: There is no “smear factor” while waiting for liquid to dry, which is a major win if your baby is in a particularly kicky mood.
- Contrast: White chalk on black paper creates a classic, “chalkboard chic” aesthetic that looks surprisingly high-end when matted and framed.
- Mechanical Bond: Because chalk is a physical particulate rather than a chemical dye, it doesn’t “soak” into the skin at all, making it perhaps the most non-invasive method available.
Related FAQs
Is a gel ink pad safe for babies’ feet?
Generally, yes—provided it is labeled “non-toxic” and “acid-free.” Gel inks are typically water-based suspensions of pigments rather than harsh chemical dyes.
However, because gel stays “wet” longer than standard ink, it can smudge or settle into the fine creases of newborn skin.
To ensure a professional stamped footprint in a frame, always perform a small patch test first. Look for a washable ink for baby handprints specifically designed for skin to ensure easy removal with a simple baby wipe.
Which colour to use to get baby footprints?
While black is the classic choice for high-contrast baby first footprint archives, “Soft Grey” or “Navy Blue” offers a modern, sophisticated aesthetic.
If you’re using a baby inkless footprint kit, the color is often pre-determined by the reactive paper.
For a DIY touch, consider “Earth Tones” like terracotta or sage green, which hide minor smudges better than bright primary colors. Always choose a shade that contrasts sharply with your paper to ensure the delicate ridge details remain visible for decades.
What type of stamp should be used to make the footprint?
With so many different stamps on the market, it can be challenging to know which ones are safe to use.
Ideally, parents should look for a wooden stamp (with a soft foam or rubber pad) made specifically for baby footprints.
Avoid those made with harmful chemicals like lead or other heavy metals. These stamps can be dangerous if not used properly.
The bottom line
Creating a footprint of your baby’s first few months is a fun way to document its growth.
And it’s a perfect way to show off their adorable toes. When kept as a memorable memento, imprinting your baby’s prints is a lovely way to commemorate their arrival into the world.
There are many ways to do this, but not all are safe. Irrespective of the type of stamp, ink, or paint you use, make sure you take a print on paper, a card, or any other surface that is safe for your baby.
Also, keep in mind to clean your baby’s skin thoroughly after taking the print, as some inks and paints can be difficult to remove later.
Share the post "Baby’s First Foot and Hand Prints (Without Paint)"

With Radon warnings and sealers out there, it can send your head into a spin about whether this is all Read more

We all love MDF for our various projects, including furniture and cabinets. After all, it's cost-effective compared to other wood Read more

For those who want their walls to have a unique appearance, glow-in-the-dark paint is one way to express creativity. As Read more

For over two hundred years, the Valspar brand has been associated with quality. Starting in 1806, the company grew into Read more

Jack Luis is a semi-retired painter who loved painting his clients’ ideas on their walls.
He had worked as a painter for over a decade serving customers in areas such as Charleston, Mount Pleasant, Beaufort, and Georgetown, SC (South Carolina). Today in his free time, he likes to read and write about the newer techniques implemented in his profession. You may read more about him here or get in touch with him here.