

Spray painting is one of those DIY upgrades that looks deceptively simple—until you end up with orange peel texture, uneven coats, or a paint cloud that makes your backyard look like a low-budget superhero movie.
The good news is that when paired with the right setup, especially a reliable Bostitch air compressor, spray painting becomes smooth, predictable, and even a little fun.
Whether you’re refreshing furniture, repainting interior trim, or planning to use a Bostitch compressor for painting a deck, this guide walks you through the process in a clear, practical way.
The star of the show—the Bostitch compressor—may be compact, but it delivers enough consistent airflow to run most HVLP and conventional spray guns for small to medium DIY projects.
In this comprehensive 7-step guide, we’ll cover everything from setup to cleanup, sprinkle in professional-grade technical details, and share small tricks that separate sloppy spray jobs from flawless finishes.
And yes—this will also help if you’re exploring the Bostitch compressor paint sprayer combo for your next home project.
Let’s dive in.
Before You Begin: What You’ll Need
You don’t need an entire workshop to get started, but having the right tools makes all the difference.
Tools and Supplies:
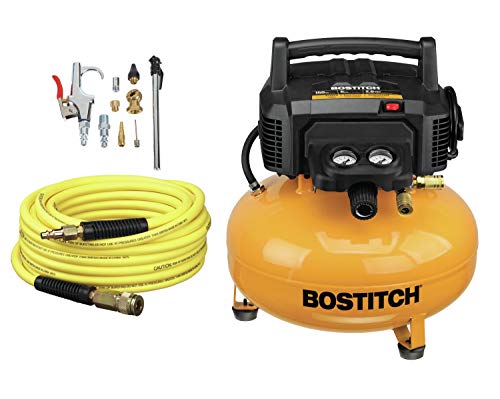
- Bostitch air compressor (6-gallon pancake or higher recommended)
- HVLP or LVLP spray gun
- High-quality air hose (25–50 feet)
- Regulator and water separator (often built into Bostitch units; if not, add externally)
- Paint strainers
- Mixing cups with ratio markings
- Painter’s tape and drop cloths
- Safety gear: respirator, goggles, gloves
- Cleaning solvent (water or mineral spirits, depending on paint type)
- Reliable Performance: 150 Max PSI and 2.6 CFM @ 90 PSI with...
- Maintenance: Air compressor includes maintenance-free pump for...
- Features: High flow regulator and couplers to maximize air tool...
*Last update on 2026-03-30 / Affiliate links / Images from Amazon Product Advertising API
How to use a Bostitch Air Compressor for Spray Painting?
Now let’s break down the steps—in a deep, detailed, and DIY-friendly flow.
Step 1: Set up the compressor
Your workspace matters most, so before you even plug in the compressor, choose a location that is:
- Stable and level
- Well-ventilated
- Away from dust or loose debris
- Close enough for your hose to reach the painting area
- Far enough that the noise doesn’t make you question your life choices
Plug the compressor directly into a wall outlet—avoid extension cords because they reduce available amperage and may cause the motor to overheat.
Air preparation matters too. Paint is sensitive to moisture, and compressors naturally collect water inside their tanks.
To avoid water droplets ruining your finish, drain the compressor tank (use the bottom release valve) and install a water separator or an inline moisture filter.
A few seconds of prep can save hours of sanding and repainting.
Step 2: Attach the hose and prepare connectors
Connect the air hose to the compressor’s outlet port. Bostitch units typically use quick-connect couplers, so the process is as simple as:
- Pull back the sleeve
- Insert the hose fitting
- Release to lock
Make sure the fit is tight—air leaks reduce PSI and CFM, causing inconsistent spray.
Hose Tip: Use a flexible hose, not a cheap PVC hose that fights you like a stubborn garden snake. Flex hoses reduce wrist strain and allow smoother painting strokes.
Step 3: Connect the spray gun and adjust the regulator
Now attach the other end of the hose to your spray gun. Use Teflon tape on threaded connections (if applicable) to minimize leaks.
Regulator Tuning – Your compressor’s built-in regulator lets you set the output PSI.
- Typical HVLP guns: 25–35 PSI
- LVLP guns: 20–30 PSI
- Conventional guns: 40–60 PSI
Always start lower, then adjust upward. Higher PSI doesn’t always mean better results—in fact, too much pressure can cause overspray and excessive bounce-back.
CFM Consideration – CFM (cubic feet per minute) is what keeps the paint flowing smoothly.
If the gun requires more CFM than the compressor delivers, you’ll notice a weak spray pattern, sputtering, and surface graininess.
Most Bostitch compressors deliver around 2.6–3.0 CFM at 90 PSI, which is perfect for HVLP detailing, cabinets, furniture, and deck rails.
Step 4: Mix, prepare, and strain the paint
Paint preparation is 50% of spray painting quality. A great spray gun and compressor won’t compensate for thick, lumpy, or badly mixed paint.
Here’s how to mix paint professionally:
- Stir thoroughly using a mixer or paddle
- Check manufacturer recommendations for thinning
- Use the right solvent: For latex paint, choose water or paint conditioner. For Oil-based paint, mineral spirits.
- Use mixing cups with ratio markings
Always Strain Your Paint: This step prevents clogged nozzles and uneven fan patterns.
Pour the mixed paint through a paint strainer into the spray gun cup. Even high-quality paint can contain microscopic debris that ruins finishes.
Step 5: Test the spray pattern
Never skip the test spray. Use cardboard, scrap wood, or a large drop cloth.
Adjust these controls:
- Fan Pattern: Wide for large surfaces, narrow for detail
- Fluid Control: Controls paint flow volume
- Air Pressure: Fine-tune atomization
A good test pattern should look like even edges, with no heavy center spots, spitting, or dripping. It will be more like a smooth, well-atomized mist.
So, take the time to tweak—your final finish will thank you.
Step 6: Start painting
Now the fun part. Whether you’re painting furniture, cabinets, or planning to use a Bostitch compressor for painting a deck, the fundamental technique is the same.
Here are a few professional painting technique tips to follow:
- Hold the gun 6–10 inches from the surface
- Move before pulling the trigger (reduces blobs)
- Overlap each pass by 30–50%
- Keep the gun perpendicular to the surface
- Avoid “arcing”—a common beginner mistake
- Keep your wrist straight and move your entire arm
Paint in thin layers. A smooth finish comes from multiple light coats—not one heavy coat that drips like melted ice cream.
Make sure you watch for signs of trouble:
- Orange peel: Paint too thick or PSI too low
- Overspray: Pressure too high or holding too far
- Runs: Moving too slowly or painting too thin
The compressor will cycle on and off—this is normal. If you hear it running continuously, you might be exceeding its CFM capacity.
Step 7: Clean up
Once you’re done admiring your freshly painted masterpiece, it’s time for the least glamorous—but most important—part of the job: cleanup.
Think of it as brushing your teeth after a great meal—maybe not exciting, but necessary if you want your gear to last.
Start by emptying whatever paint is left in your spray gun, then give the cup a good rinse with the appropriate solvent (water for latex, mineral spirits for oil-based paints).
Run a little of that solvent through the gun until the spray comes out clear.
After that, pop off the nozzle and needle, give them a gentle scrub with a soft brush, and let everything dry before reassembling.
Don’t forget about the compressor, either.
Drain the moisture from the tank (yes, every single time), double-check your hose connections, and store the whole setup in a cool, dry place.
A few minutes of care now saves you from clogs, rust, pressure drops, and surprise “why is this sputtering?” moments later. Proper cleanup is your future self’s best friend in spray painting.
Also, a well-maintained compressor lasts for years and consistently produces clean, dry air—essential for professional finishes.
Should a paint compressor stay on unattended?
It’s not recommended to leave your paint compressor running unattended.
Compressors can cycle unexpectedly, build excess heat, or develop leaks without you noticing. If a hose pops off, a fitting fails, or the motor overheats, you want to be right there to shut it down.
Always turn off your portable Bostitch compressor unit when stepping away, even for a short break—it protects the equipment, your workspace, and most importantly, your safety.

Do You Really Need a Bostitch Compressor for Your Project?
You might be wondering right about now—Do I actually need an air compressor and spray gun for my job?
After all, you’re not repainting the White House, and you’ll probably go months (maybe years) before you tackle another big painting project.
So why invest in what looks like “contractor-grade” equipment just to save a weekend?
Fair question.
But here’s the part most DIYers don’t realize until they try it: a good compressor-and-sprayer setup doesn’t just save time—it elevates the quality of the finish in a way brushes and rollers simply can’t.
And when that compressor happens to be a Bostitch—known for consistent PSI output and low-maintenance, oil-free pumps—you get reliable airflow that produces smoother atomization and fewer surface defects.
Beyond painting, a portable air compressor is one of the most versatile tools you can own. You can use it to:
- Blow out dust from tools, filters, and workspaces
- Inflate tires, sports gear, rafts, and air mattresses
- Power pneumatic nailers, staplers, or impact tools
- And yes—run a spray gun for everything from trim and cabinets to fences, decks, and even small automotive touch-ups
From a technical standpoint, compressed-air spray guns offer better atomization because they rely on consistent CFM (air volume) and stable PSI (air pressure)—two things no electric sprayer can fully match.
This means finer droplets, better coverage, fewer lap marks, and a more professional finish, especially when it’s a project like painting your deck.
And let’s talk about cost for a moment.
Sure, a spray setup isn’t free, but once you have it, you’ll spend far less on rollers, trays, disposable covers, and endless packs of cheap brushes that shed like a nervous cat.
In the long run, a compressor-powered sprayer often pays for itself—not just in money saved, but in the quality and speed of your projects.
So yes, even if you’re not painting an entire house, a Bostitch compressor paint sprayer might be one of the smartest (and most versatile) upgrades you make to your DIY toolkit.
Here are a few tips on how to choose the right Bostitch compressor for your project:
- For home DIY, occasional jobs, nailers or small spray/trim work → go for a pancake or small trim-compressor (oil-free) model.
- For moderate tasks, longer runtime, small woodworking or automotive jobs → a hot dog / mid-sized tank model strikes a balance.
- For heavy-duty, repeated or continuous tasks (spray painting, power tools, workshop work) → a twin-tank / larger tank compressor, optionally oil-lubricated, is worth it.
Above all, if you want minimal maintenance and portability from your Bostitch compressors, choose oil-free.
However, if you care more about durability and continuous operation, consider an oil-lubricated Bostitch compressor.

Common Problems With Bostitch Air Compressors (and Easy Fixes)
Bostitch air compressors are known for being durable, low-maintenance, and impressively consistent for their compact size.
Still, like any piece of pneumatic equipment, they can occasionally throw a tantrum.
Understanding these issues—and knowing how to troubleshoot them—can help you protect your investment and keep your spray painting workflow smooth and efficient.
Below are the most common problems Bostitch users run into, plus simple, accurate fixes tailored to these oil-free compressors (yes, that means no messy oil checks).
1. When your Bostitch won’t start
If your Bostitch compressor refuses to start, don’t panic—it’s usually staging a small protest, not dying.
The first thing I always check is the tank pressure gauge. If the pressure is already above the cut-in level, the motor simply won’t kick on because the pressure switch is doing its job.
Just crack open the drain valve and release some air until it drops.
Also, remember that Bostitch compressors hate extension cords; low voltage is their sworn enemy.
Plug it directly into a proper outlet, make sure the reset hasn’t tripped, and nine out of ten times, it’ll spring back to life without any drama.
2. The annoying humming sound
A humming Bostitch compressor is basically saying, “I’m trying, but something’s blocking me.” This usually means the motor is fighting trapped pressure or a weak start capacitor.
The unloader valve is often the real troublemaker—if it fails to release pressure after the motor stops, the next start cycle becomes a struggle.
Replacing the unloader valve is cheap and straightforward, and it fixes the issue in most cases.
If the humming continues even with low tank pressure, the start capacitor might be the guilty one; those do wear out over time.
And again, low voltage can make a perfectly good compressor sound like it’s groaning its last breath, so don’t rule that out.
3. Air leaks – the little hiss that drives you nuts
If your Bostitch is hissing like a mildly irritated cat, you’re probably dealing with an air leak. Fortunately, this is one of the easiest problems to troubleshoot.
I just disconnected the air hose, kept the compressor pressurized, and dabbed soapy water on every fitting, quick-connect, and seal. Wherever bubbles appear—that’s your leak.
Most of the time, it’s just a worn O-ring or a slightly loose connector. Since Bostitch uses standard ¼” NPT fittings, replacements are cheap and easy to find.
Internal leaks inside the pressure switch or regulator are rare, but if you suspect one, letting a repair shop handle it is usually the smarter choice.
4. Random shutdowns & overheating
If your Bostitch compressor keeps shutting off mid-task, it’s probably the thermal overload kicking in.
These compressors protect themselves quickly when things get too warm.
Sometimes it’s just dust blocking the air vents or a clogged intake filter forcing the motor to work harder than necessary.
A quick cleaning often solves the issue. Low voltage is another common culprit—if the outlet can’t deliver enough power, the motor heats up fast and shuts down to save itself.
Defective pressure switches can also cause odd cycling, but that’s less common.
And if you’re working in a cold garage, remember that oil-free compressors still get sluggish when seals stiffen—so giving the unit 10–15 minutes indoors to warm up can make a world of difference.
5. Weak or inconsistent airflow (your compressor feels “tired”)
When your Bostitch starts delivering weaker airflow than usual, it’s often hinting at small restrictions in the system.
A partially clogged intake filter, regulator issues, or minor leaks can all cause pressure drops.
I always check the regulator first—sometimes it’s accidentally dialed down, or the internal spring gets sticky with dust.
Next, I look at the hose; a kinked, cracked, or cheap hose can choke airflow more than people realize.
If everything external checks out, the pressure relief valve or check valve may be sticking, which prevents proper pressurization. These parts are surprisingly inexpensive and easy to swap out.
Once fixed, the consistent, steady airflow that Bostitch units are known for usually comes right back.

Maintaining Your Bostitch Compressor: Maximizing Lifespan and Efficiency
Maintaining your Bostitch compressor isn’t complicated—just a few simple habits can dramatically boost its lifespan and day-to-day performance.
Think of it as giving a little attention now to avoid big headaches later.
1. Keep an eye on the oil (if yours is oil-lubricated)
Think of your compressor’s oil like the engine oil in a car—ignore it, and things start grinding, overheating, and wearing out way faster than they should.
Just peek at the oil level every few uses and top it up when needed. A quick oil change every few months (depending on usage) keeps your Bostitch running smooth and happy.
2. Drain the tank after every session
Moisture build-up inside the tank is sneaky—it sits there quietly, slowly rusting the tank from the inside.
That’s why draining the tank after each use is a small habit that pays off big in the long run. It takes 10 seconds, prevents corrosion, and keeps pressure performance consistent.
3. Clean or replace the air filter regularly
Your compressor needs to “breathe,” and a clogged air filter is like asking it to run a marathon while wearing a mask.
Every month or so, just pop the filter out, tap out the dust, or replace it if it’s looking tired. A clean filter improves airflow, reduces strain, and actually helps the motor last longer.
4. Tighten fittings and check for leaks
Air leaks are silent efficiency killers—your compressor keeps cycling even when you’re not using it.
Every few weeks, run a quick check: tighten fittings, listen for hissing, or spray a little soapy water around connections to spot bubbles.
Fixing tiny leaks gives you more usable air and cuts down on unnecessary wear.
5. Store it right — clean, dry, and uncluttered
Where you keep your compressor matters more than people think. A dusty corner or damp shed slowly affects internal components.
Just give it a clean spot, keep it covered, and store it in a dry place. This simple habit helps the machine stay rust-free, dust-free, and always ready for the next job.
Frequently Asked Questions
Can a Bostitch air compressor run any spray gun?
No, not all. While it pairs well with HVLP and LVLP guns, high-end conventional guns requiring 8–12 CFM may exceed the compressor’s capacity. Always match the CFM requirements first.
You can even paint indoors using a Bostitch compressor, provided you have strong ventilation, a proper respirator, and controlled overspray. Otherwise, paint mist will settle everywhere—including your lungs.
Is a water separator necessary with a Bostitch compressor?
Yes—100%. Moisture ruins paint finishes. Even oil-free compressors produce condensation, so using a moisture filter is essential for smooth, blemish-free painting.
What PSI is best for spray painting with a Bostitch compressor?
Most projects look best between 25–40 PSI, depending on the paint and spray gun. Start low and adjust upward only if atomization looks weak.
Most models are designed for intermittent duty cycles. If the compressor is running non-stop, you may be pushing it beyond its CFM limits; switch to a lower-demand spray gun or take short breaks.
Can I use a Bostitch compressor for spraying cabinets and a deck?
Yes, you can use a Bostitch compressor for spraying cabinets, painting a deck, and even for blowing off peeling paint—as long as the compressor delivers enough CFM for your specific spray gun.
Most HVLP guns need around 2–4 CFM at 40 PSI, which many Bostitch pancake or hot-dog compressors can handle for short, controlled bursts.
For larger surfaces like decks, you may need to pause occasionally for the tank to refill, but the results will still be smooth and consistent.
The Bottom Line
Using a Bostitch air compressor for spray painting isn’t just practical—it’s one of the most cost-effective ways to achieve a flawless, professional finish at home.
With stable PSI, dependable airflow, and low maintenance needs, the Bostitch lineup is perfect for DIYers tackling anything from furniture restoration to trim work—or even refreshing exterior wood if you’re exploring the Bostitch compressor paint sprayer approach.
By following the easy steps, preparing your paint properly, and practicing good technique, you’ll enjoy smooth, even coats with minimal overspray and maximum efficiency.
Once you master the setup, you’ll realize spray painting isn’t just a task—it’s an upgrade to your entire DIY toolkit.
If you want, I can also create a printable checklist version or optimize this for SEO with additional subheadings.
Share the post "7 Steps to Use a Bostitch Air Compressor for Painting"

From building furniture and refurbishing existing furnishings to touching up the doors, tables, and other wooden pieces in your home, Read more

Getting the best paint job means more than using the right paint. In addition to having good brushes and rollers, Read more

You are in the middle of sanding your walls, and you realize that there are still many more pieces of Read more

I remember the early days when my father, as a painter, did not have many options for spraying the cabinets Read more

Jack Luis is a semi-retired painter who loved painting his clients’ ideas on their walls.
He had worked as a painter for over a decade serving customers in areas such as Charleston, Mount Pleasant, Beaufort, and Georgetown, SC (South Carolina). Today in his free time, he likes to read and write about the newer techniques implemented in his profession. You may read more about him here or get in touch with him here.