

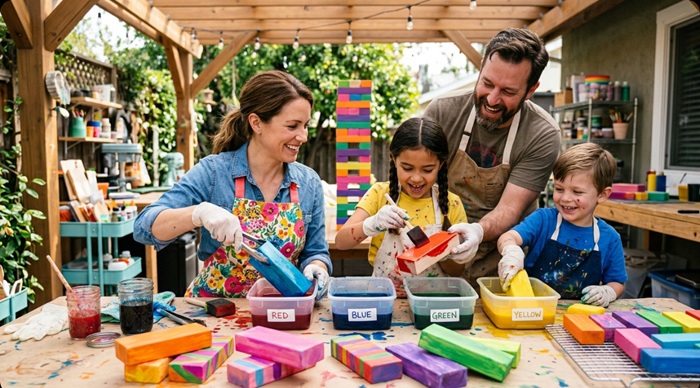
There’s something oddly satisfying about turning a simple game into a personal masterpiece.
A classic Jenga tumbling toy already delivers suspense, laughter, and the occasional dramatic collapse—but give it a splash of color, and suddenly it becomes your game.
I discovered this firsthand while repainting my son’s old set one weekend.
What started as a quick DIY turned into a surprisingly technical (and occasionally messy) project—equal parts craftsmanship and bonding time.
Painting Jenga Wood Blocks
If you’ve ever dabbled in wood block crafts, you’ll know: the smallest details can make the biggest difference.
But here’s the catch—painting wooden game blocks isn’t just about slapping on color. The wrong paint, poor prep, or skipping sealing can ruin the finish (and even affect gameplay).
That’s why this guide goes beyond the basics. It blends creativity with practical, technical know-how so your painted Jenga set doesn’t just look great—it plays great too.
Let’s get into it.
1. Set up the workspace
Before you even open a paint bottle, your workspace deserves attention.
Painting dozens of small wooden blocks can quickly get chaotic—paint drips, misplaced pieces, uneven drying—it’s all avoidable with a little planning.
Choose a well-ventilated, clutter-free area like a garage, patio, or backyard. Spread a drop cloth or layers of newspaper across your surface.
This isn’t just about protecting furniture—it also prevents dust and debris from sticking to your freshly painted blocks.
If you want to get slightly more technical, consider airflow and humidity. Wood absorbs moisture, and high humidity can slow drying times or create tacky finishes.
Ideally, aim for a dry, moderate environment (around 60–75°F / 15–24°C). It’s a small detail, but it significantly improves your results.
2. Choose the right paint
Paint selection is where creativity meets durability.
While you can use watercolors or spray paint for decorating old wooden Jenga blocks, acrylic paint stands out as the best choice for most DIYers—and for good reason.
Acrylic paint offers:
- Strong adhesion to wood
- Quick drying time
- Excellent color vibrancy
- Layering flexibility
If your blocks will be used outdoors or handled frequently (which they will), go for non-toxic, water-based acrylics with a durable finish. These resist chipping and fading better than lighter options.
For those experimenting with painting wargame wood blocks, the same principle applies—precision and durability matter.
Thin, controlled layers of acrylic ensure details stay sharp without affecting the block’s dimensions.
Pro Tip: Avoid thick enamel paints—they can make blocks sticky or slightly uneven, which can ruin the stacking experience.
3. Pick colors with purpose
Color choice isn’t just about looks—it can change how the game is played.
When painting your Jenga wooden blocks, you can go with shades like:
- Classic: Single color for a polished, minimalist look
- Vibrant: Bright primary colors (great for kids)
- Thematic: Match your garden, party theme, or décor
- Functional: Color-code blocks for custom rules
Want to level it up?
Add patterns, numbers, or prompts (like “Truth or Dare” or “Fitness Challenge”).
This transforms your Jenga into an interactive experience rather than just a stacking game.
From a technical perspective, lighter colors may require more coats, while darker shades often provide better coverage in fewer layers. Planning this ahead saves time and paint.

4. Prep the wood properly
Jenga blocks are typically made from hardwoods like maple or beech, which are naturally smooth—but not perfect for paint adhesion right out of the box.
This is where sanding comes in.
Use fine-grit sandpaper (around 220 grit) to lightly scuff the surface. You’re not reshaping the block—just creating micro-texture so the paint can grip better.
Why it matters:
- Improves paint adhesion
- Reduces streaking
- Prevents peeling or chipping
After sanding, wipe each block with a dry or slightly damp cloth to remove dust. Skipping this step is one of the most common mistakes—and it shows in the final finish.
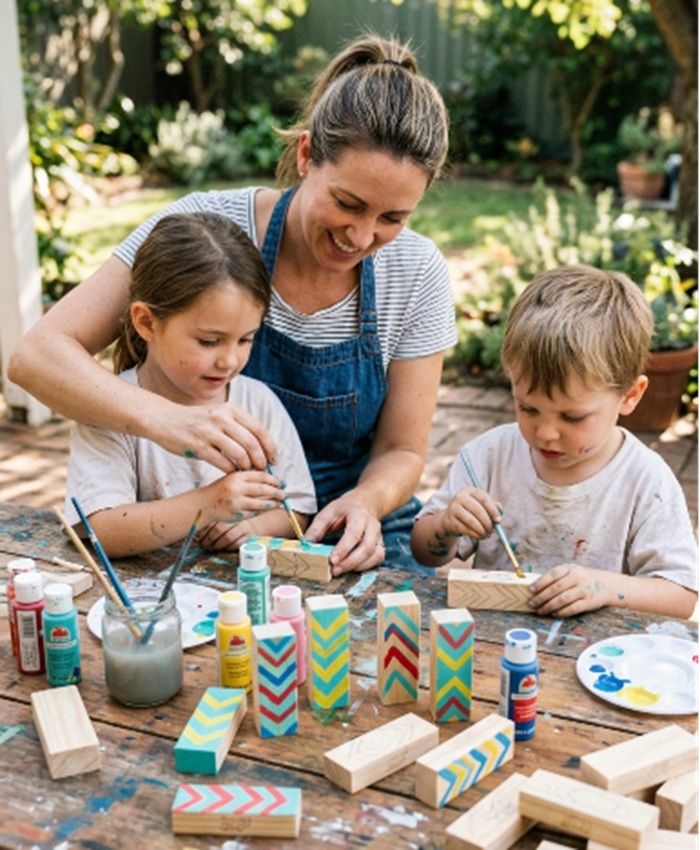
5. Apply paint like a pro
Now comes the fun part—painting. But resist the urge to rush.
Use a wide, soft-bristle brush for even coverage on your Jenga wood game.
Apply thin, consistent coats rather than thick layers. Thick paint may seem faster, but it often leads to:
- Drips
- Uneven drying
- Sticky surfaces
Allow each coat to dry completely before applying the next. Typically, 1–2 coats are enough for solid coverage.
Here’s a quick reference to guide your painting process:
| Step | Best practice | Why it matters |
|---|---|---|
| Brush Selection | Wide, soft-bristle brush | Even, streak-free finish |
| Coat Thickness | Thin layers | Prevents drips and uneven texture |
| Drying Time | 20–40 minutes per coat (acrylic) | Ensures smooth layering |
| Number of Coats | 1–2 coats | Balanced coverage without bulk |
| Handling | Avoid touching wet surfaces | Prevents smudges and fingerprints |
6. Seal Jenga for durability
If you want your painted Jenga set to last more than a few games, sealing is non-negotiable.
A clear sealant protects the painted Jenga blocks from scratches, moisture, and frequent handling, so you can use one of the following:
- Mod Podge sealer spray
- Clear acrylic sealer (matte or glossy)
- Polyurethane (for extra durability)
Apply a thin, even coat and let it cure fully. This step not only extends the life of your paint but also enhances the feel of the blocks—making them smoother and more resistant to wear.
Some people even experiment with wax for painted jenga blocks as a finishing touch.
While wax gives a soft sheen and smooth glide, it’s less durable than a proper sealant—so consider it an optional final polish rather than your main protection.
7. Let your Jenga blocks cure fully
Drying and curing are not the same thing—and this is where many DIY projects go wrong.
Drying means the paint feels dry to the touch.
Curing means the paint has fully hardened.
For acrylic paint:
- Touch dry: ~30 minutes
- Fully cured: 24–72 hours
If you stack or play with the blocks too soon, you risk sticking blocks, smudged paint, and even permanent dents. So, its good to give your blocks enough time to cure completely before assembling the tower.
Trust me—waiting a day or two is far better than redoing the entire project.
Can You Use Dye or Stain on Jenga Blocks?
Absolutely—you can use dye or wood stain on Jenga blocks, and in many cases, they’re actually better than paint if you want a more natural, professional-looking finish.
While paint sits on top of the surface, dyes and stains penetrate the wood, enhancing its grain rather than hiding it.
The result is a richer, more refined look that still preserves the tactile feel of the original Jenga tumbling toy.
That said, dyeing or staining isn’t just a dip-and-dry process. So, it’s good to understand the difference between dye and wood stain.
Also, there’s a bit of technique involved if you want consistent color, smooth gameplay, and long-lasting results.
- Wood Dye: A water- or alcohol-based solution that soaks deep into the wood fibers. It produces vibrant, uniform colors while keeping the grain clearly visible.
- Wood Stain: A thicker product that includes pigments and binders. It not only colors the wood but can also add slight protection and depth, often resulting in a more traditional “furniture-style” finish.
If you’re into wood block crafts, dye is great for bold, modern colors, while stain is ideal for a classic, rustic look.
How to do it?
Dyeing Jenga blocks is a simple process, but doing it carefully ensures a smooth, even finish that won’t affect gameplay.
- Start by choosing a non-toxic, waterproof dye, preferably water-based, for easy handling.
- Prepare a dye bath in a container deep enough to submerge the blocks, then place them in for about 10–15 minutes, depending on how light or dark you want the color.
- Stir occasionally to avoid uneven patches.
- Once dyed, remove the blocks and let them dry completely, making sure they’re spaced apart so they don’t stick together.
- Drying can take a few hours, but patience here ensures a clean finish.
- For added durability—especially if the blocks will be used often—you can apply a clear sealant after they’ve dried.
If you prefer a more controlled and classic look, wood stain is a great alternative. Instead of soaking, apply it with a cloth or brush, wipe off the excess, and let it dry thoroughly.
While staining takes a bit more time since each block is done individually, it gives you better control over depth and shading for a more refined result.

- THE ORIGINAL WOOD BLOCK GAME: Dare to risk it? Pull out a block, place...
- FAST, EXCITING, ANYTIME FUN: With a simple set up, easy-to-learn...
- GREAT KIDS PARTY GAMES: Suspense, surprises, laughs! Liven up a party...
*Last update on 2026-03-30 / Affiliate links / Images from Amazon Product Advertising API
Choosing between Paint, Dye, and Stain for Jenga Blocks
Before choosing a finish, it helps to understand the wood itself.
Original Jenga blocks (created by Leslie Scott and popularized by Hasbro) are typically made from Alder or Paulownia wood—both lightweight yet strong hardwoods.
Some sets also use Beechwood, which is slightly denser and smoother. The key is balance: the wood must be durable enough to stack, yet light enough for smooth gameplay.
Here’s a quick comparison to help you decide:
| Feature | Paint | Wood Dye | Wood Stain |
|---|---|---|---|
| Finish Type | Opaque (covers wood grain) | Transparent (shows grain clearly) | Semi-transparent (enhances grain) |
| Look & Style | Bright, bold, creative | Vibrant yet natural | Classic, rich, premium |
| Best For | Patterns, designs, kids’ projects | Color + natural wood feel | Elegant, furniture-style finish |
| Application Method | Brush or spray | Soaking or dipping | Cloth or brush (wipe-on) |
| Durability | High (with sealant) | Medium (needs sealing) | High (built-in protection + sealant) |
| Impact on Gameplay | Can affect smoothness if applied thick | Minimal impact | Minimal to slight impact |
| Skill Level | Beginner-friendly | Easy | Moderate (needs even application) |
What are the Things You Can Paint on Wooden Jenga Block Set?
One of the best things about customizing a Jenga set is that there are virtually no limits to what you can paint.
Whether you’re going for a playful, educational, or design-forward look, your blocks can become much more than just stacking pieces—they can turn into a creative extension of your personality.
If you’re already exploring wood block crafts, this is where things really get interesting.
Let’s break down some of the most effective (and fun) ideas you can try.
1. Simple patterns that always work
If you’re new to painting or want a clean, modern finish, simple patterns are your best friend.
Think stripes, polka dots, zigzags, or checkerboards. These designs are easy to execute and don’t require advanced artistic skills, yet they instantly elevate the look of your set.
From a technical standpoint, patterns also help maintain consistency across blocks.
Using painter’s tape for stripes or stencils for dots ensures precision and repeatability—especially useful when working with dozens of identical pieces.
Plus, simple patterns dry faster and are less prone to visible brush errors.
2. Faces, emojis, and character art
Want to make your Jenga set more interactive or kid-friendly?
Try painting faces, emojis, or even cartoon-style expressions. Each block can carry a unique personality—happy, surprised, sleepy, or even mischievous.
This approach works particularly well if you’re painting with children. It encourages creativity and storytelling during gameplay.
Just make sure to use fine brushes or paint markers for detailing, as facial features require more control than broad patterns.
3. Educational elements for kids
If you have young learners at home, this is where your painted Jenga set becomes both fun and functional. You can paint:
- Alphabets (A–Z)
- Numbers (1–100 or basic counting sets)
- Shapes or colors
- Simple words or sight words
This transforms your game into a hands-on learning tool. For example, kids can be asked to pronounce a letter or solve a simple math problem before removing a block.
Technically speaking, high-contrast colors (like black on yellow or white on blue) improve readability, especially for smaller text.
Using a fine-tip paint pen instead of a brush can also give cleaner, more legible results.
4. Words, prompts, and game challenges
If your audience is teens or adults, consider turning your Jenga into a “challenge tower.” Instead of just pulling a block, players must complete a task written on it.
Some ideas include:
- “Do 10 push-ups”
- “Tell a funny story”
- “Truth or Dare”
- “Sing a song”
This adds a social and unpredictable element to the game. It’s especially popular at parties or family gatherings.
From a design perspective, keep the text concise and use a consistent font style across blocks. You can lightly sketch with pencil before painting to maintain alignment and spacing.
5. Symbols, icons, and themed designs
For a more aesthetic or niche approach, you can paint symbols or icons based on a theme:
- Nature (leaves, flowers, sun, waves)
- Festivals (Halloween pumpkin, Christmas trees)
- Gaming icons (dice, swords, shields)
- Minimalist symbols (arrows, stars, geometric shapes)
This is also where ideas from painting wargame wood blocks can inspire you—clean iconography, strategic markings, and color-coded systems can make your set visually striking and functional at the same time.
6. Multi-sided color coding (advanced gameplay twist)
If you’re looking to add a real challenge, try painting each side of the block in different colors.
Unlike standard Jenga, where blocks look identical, this variation introduces unpredictability and strategy.
For example:
- Assign rules to colors (red = skip turn, blue = double move, etc.)
- Or simply use colors to confuse players and make block selection harder
Technically, this requires careful planning. You’ll need to:
- Paint each side separately and allow proper drying time
- Avoid paint buildup on edges (which can affect stacking stability)
- Maintain uniform thickness across all sides
This method not only enhances gameplay difficulty but also turns your set into a visually dynamic piece.
7. Abstract and artistic designs
If you want to go full creative mode, abstract art is your playground. Think gradients, splashes, marbling effects, or even mini canvas-style paintings on each block.
This approach is less about uniformity and more about expression. No two blocks need to look the same—and that’s the beauty of it.
However, keep one technical rule in mind: avoid overly thick textures. Raised paint can interfere with how smoothly the blocks slide against each other, which is crucial for gameplay.
Tips for Cleaning and Storing the Painted Jenga Wooden Block Game Set
Once you’ve put in the effort to customize your Jenga set, a little care goes a long way in keeping it looking fresh and playing smoothly.
Painted wooden blocks are durable—but not indestructible—so proper cleaning and storage are essential.
1. Clean gently after use
Avoid soaking your blocks in water or using harsh chemicals. Instead, wipe them down with a soft, dry cloth after each use to remove dust and oils from hands.
If needed, use a slightly damp cloth—but make sure to dry them immediately. Excess moisture can damage both the paint and the wood over time.
2. Avoid abrasive scrubbing
It might be tempting to scrub off dirt, but rough sponges or brushes can scratch the paint and ruin the finish.
If you encounter stubborn marks, use a mild soap solution with a soft cloth and gentle pressure. The goal is to clean without stripping away your design.
3. Keep them completely dry
Moisture is the biggest enemy of painted wood. Even a small amount of trapped moisture can lead to swelling, warping, or paint peeling.
Always ensure the blocks are fully dry before stacking or storing them.
4. Store in a cool, dry place
Humidity and temperature fluctuations can affect both the wood and the paint.
Store your set in a cool, dry area, away from direct sunlight, which can cause colors to fade over time. Avoid damp basements or overly hot spaces like attics.
5. Use a storage box or pouch
Keeping your blocks in a box, fabric pouch, or the original sleeve helps protect them from dust, accidental spills, and physical damage.
It also prevents edges from chipping due to unnecessary movement.
6. Stack properly to maintain shape
After cleaning, stack the blocks neatly in their original tower form.
This helps maintain their shape and prevents uneven pressure that could lead to slight warping—especially important if you’ve added paint layers.
7. Reapply protection when needed
Over time, frequent use may wear down the protective layer.
If you notice fading or minor scratches, consider applying a fresh coat of clear sealant to restore durability. This is especially useful for heavily used sets.
The Bottom Line
Painted Jenga block sets are a great way to add colors to your favorite games. Additionally, they make great gifts – if you’re looking for a unique and thoughtful gift, consider a painted Jenga set.
When painting, choose the right paint, take your time, be patient, and decorate the blocks with your favorite colors or custom designs.
Let your creativity run wild with Jenga blocks, as the sky is the limit.
Share the post "7 Tips to Paint Your Jenga Wood Blocks Game"

When you put up new drywall, it may seem that all you need to do is add two coats of Read more

Estimating the amount of paint you will need to paint your house is not rocket science. But it can be Read more

To dry appropriately, paint uses four components; Additives, Binder, Filler, and Solvent. The effectiveness of all four will depend on Read more

Painting your house is always a big deal, with lots of questions and decisions to work on. Though every house Read more

Jack Luis is a semi-retired painter who loved painting his clients’ ideas on their walls.
He had worked as a painter for over a decade serving customers in areas such as Charleston, Mount Pleasant, Beaufort, and Georgetown, SC (South Carolina). Today in his free time, he likes to read and write about the newer techniques implemented in his profession. You may read more about him here or get in touch with him here.