

You’re in the shower on a cool wintery morning, enjoying the feel of hot water cascading over your body and sudsing up your hair.
Suddenly, you notice a hairline crack in one of the tiles. And then you see another and another.
Your very first instinct might be to grab a hammer and break out the damaged tiles. But before you do any demolition, calm down and rethink.
The good news is that most hairline cracks in shower tile are more cosmetic than catastrophic — and in many cases, you can repair them beautifully without removing a single tile.
In this guide, I’ll walk through practical, step-by-step methods to repair hairline cracks in shower tile without removal, using the right materials and techniques to protect both appearance and durability. Because when it comes to bathroom repairs, smart fixes always beat unnecessary demolition.
What Causes Hairline Crack in Bathroom Tile?
For starters, hairline cracks in bathroom tile are common — and they usually point to minor stress rather than major structural failure.
Here are the most common causes:
Normal Structural Movement – Homes naturally expand and contract due to temperature changes, humidity, and settling. Even slight movement in walls or subfloors can transfer stress to rigid tile, resulting in fine cracks.
Improper Installation – If the tile wasn’t installed on a properly prepared, level surface — or if insufficient adhesive was used — hollow spots can form underneath. Over time, pressure from foot traffic or impact can cause the tile surface to crack.
Subfloor Flexing or Weak Backer Board – In showers and bathrooms, tiles rely on a solid cement backer board or properly reinforced substrate. If the surface beneath flexes even slightly, the tile (which doesn’t bend) can develop hairline fractures.
Impact Damage – Dropping a heavy shampoo bottle, showerhead, or tool can create a small surface crack. Sometimes the damage appears subtle at first but becomes more visible over time.
Thermal Stress and Moisture Changes – Hot showers followed by cooling periods cause expansion and contraction. Repeated cycles (especially in poorly ventilated bathrooms) can gradually weaken the tile surface and lead to fine cracking.
If the crack is very thin and doesn’t shift when pressed, it’s typically cosmetic. However, widening cracks or loose tiles may indicate a deeper substrate issue that needs attention.
How to Repair Cracked Shower Tile Without Removing
Shower tiles with hairline cracks can be repaired without removal by one of the mentioned methods.
However, if the crack is still visible or significantly larger, you can try a combination of the techniques I have detailed below.
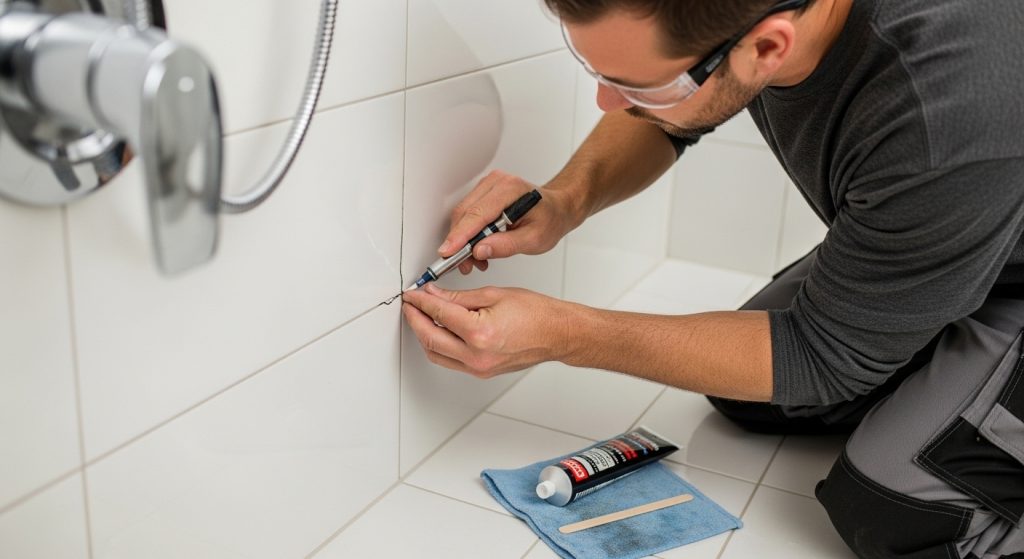
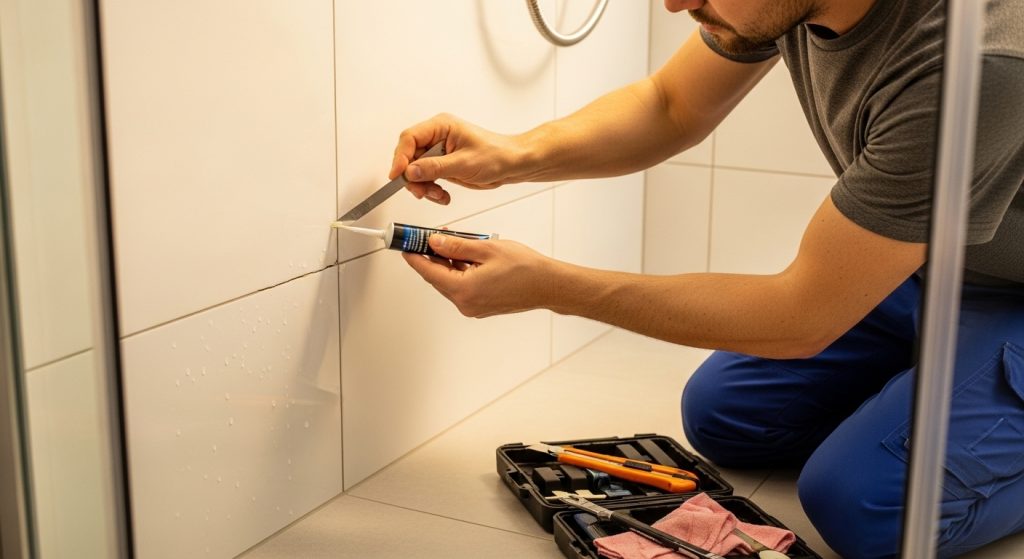
Method 1 – Using Epoxy for Tile Repair
The best way to repair a hairline crack in the shower tile without removing it is by using epoxy resin.
Epoxy resin is a robust and durable material that can be used to fill in gaps and holes. It’s also waterproof, so it’ll seal up the crack and prevent water from getting in and damaging the tile.
To get started, all you’ll need is epoxy resin, old cardboard, a mixing stick, a paintbrush, and a hairdryer.
Step 1- Clean the tile
For long-lasting results, you should have a spotless and dry tile area. So, start by cleaning the area around the crack with soap.
Use some rubbing alcohol if the tile is too dirty, and then rinse the fractured area nicely. To fully dry the inside of the hairline crack, use a hairdryer for 10 to 15 minutes.
Step 2- Mix and apply two-part clear epoxy
On a disposable lid or a piece of old cardboard, mix equal epoxy contents using a small mixing stick.
Then, using a thin paintbrush or a toothpick, dab a tiny amount of epoxy mixture into the hairline crack. If required, use some more epoxy mix to fill the crack until you get an even layer on the tile.
Step 3- Dry the tile
Once filled, keep the repaired areas dry for at least 12 hours for the epoxy to set.
Also, do not allow foot traffic for 24 hours, and do not allow any water to come in contact with the repaired area for at least 72 hours.
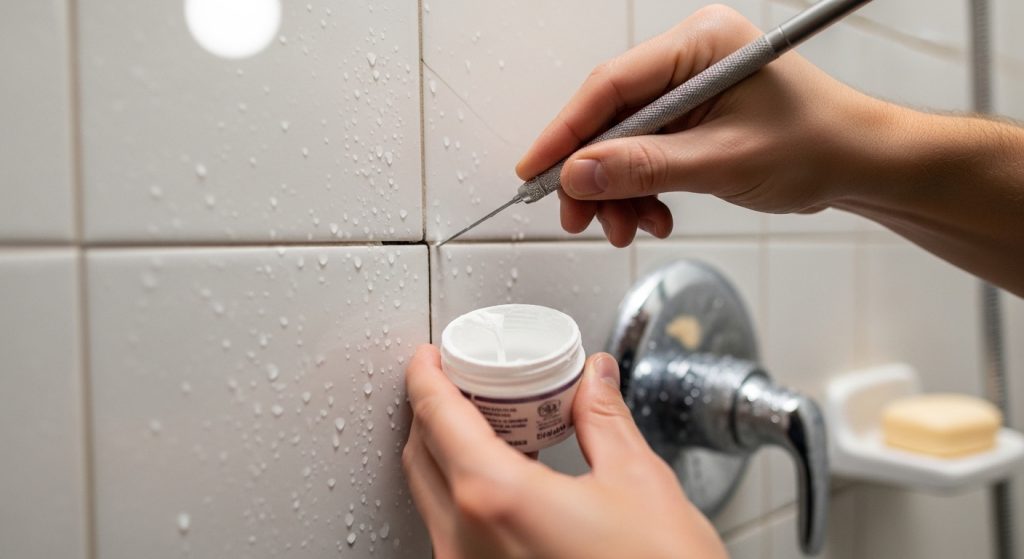
Method 2 – Using Super Glue to Fix Tile Cracks
Super Glue — technically known as cyanoacrylate adhesive (CA glue) — is a fast-acting, single-component adhesive that bonds almost instantly when it comes into contact with moisture in the air.
Because it cures quickly and forms a strong, rigid bond, it’s widely used for both industrial and household repairs on materials like plastic, metal, wood, and ceramic.
For very fine, surface-level cracks in shower tile, super glue can serve as a simple and effective repair solution — without removing the tile.
This approach is ideal for:
- Very thin, non-moving hairline cracks
- Cosmetic surface fractures
- Small cracks in new glazed ceramic tile
However, be aware that it is not suitable for deep cracks, loose tiles, or areas exposed to heavy structural movement.
Here’s a step-by-step instruction when using this method:
Step 1. Clean the area thoroughly
Proper surface preparation is critical. Clean the cracked area with rubbing alcohol and a lint-free cloth to remove soap residue, oils, mildew, or moisture. Any contamination can prevent proper bonding.
Allow the surface to dry completely before proceeding. And mask around the crack with painter’s tape if precision is a concern.
Step 2. Apply the glue carefully
Use a toothpick, fine applicator tip, or needle to transfer a very small amount of super glue directly into the crack. The goal is to let the adhesive wick into the fracture — not sit on top of the tile.
Avoid over-applying. Excess glue can spill onto the tile surface and create a glossy patch that’s difficult to remove once cured.
Step 3. Let it cure fully
Although super glue bonds within minutes, allow at least 24 hours of curing time before exposing the tile to moisture or using the shower. This ensures the adhesive fully hardens and seals the crack.
If a slight shine remains after curing, a very fine polishing compound can help blend the surface.
Method 3 – Fixing Chipped Shower Tile with Nail Polish
It may sound unconventional, but nail polish can be a surprisingly effective way to repair small chips and hairline cracks in ceramic or porcelain shower tiles.
Designed to be durable, glossy, and water-resistant, nail polish works well as a quick cosmetic touch-up — especially when the damage is minor and limited to the tile’s surface glaze.
This method works best for:
- Small chips in glazed ceramic or porcelain tile
- Fine surface cracks that are cosmetic only
- Areas not subjected to heavy abrasion
If you have a steady hand and an eye for color matching, this method can deliver a clean, nearly invisible repair.
However, keep in mind, this is primarily a visual repair — it improves appearance and adds light moisture resistance, but won’t fix structural movement beneath the tile.
Here are step-by-Step Instructions you should follow to use this technique:
1. Clean and dry the surface
Start by thoroughly cleaning the damaged area with rubbing alcohol to remove soap scum, oils, and residue. Allow the tile to dry completely before applying anything.
2. Match the color carefully and apply it in thin layers
Choose a nail polish shade that closely matches the tile. For glossy porcelain tiles, select a polish with a similar sheen. If an exact match isn’t available, blending two similar shades can sometimes produce better results.
Using the polish brush (or a small detail brush for precision), carefully fill the chip or hairline crack. Apply thin layers rather than one thick coat to prevent bubbling or uneven texture.
3. Wipe excess immediately and allow proper curing time
Before the polish fully dries, gently wipe away any excess from the surrounding tile using a soft cloth or cotton swab. This helps keep the repair area neat and blended.
Let the polish cure completely — typically 24 hours — before exposing the tile to water.
Alternative Option: Waterproof Paint
If you prefer a more durable solution, waterproof enamel or tile repair paint can be used instead of nail polish.
These products are specifically designed for bathroom and kitchen environments and may provide better long-term resistance to moisture.
While this method won’t replace a full tile repair, it’s an affordable and practical way to restore the look of chipped shower tiles without removing them.
Can Acrylic Adhesive be Used for Shower Tile Repair?
Yes, acrylic adhesive — commonly referred to as tile mastic — can be used for certain types of shower tile repairs, particularly for reattaching loose or fallen tiles on vertical surfaces such as shower walls or tub surrounds.
These adhesives are water-resistant and convenient to use, making them suitable for areas exposed to intermittent moisture rather than constant saturation.
For small wall repairs, they offer good initial grab and easy application, which makes the job quicker and cleaner.
However, acrylic adhesive does have limitations. It should not be used on shower floors, steam rooms, or areas exposed to standing water, as it is not designed for continuous moisture or submerged conditions. Over time, excessive water exposure can weaken the bond.
Additionally, it is best suited for small- to medium-format ceramic, mosaic, or porcelain tiles (generally up to about 8–15 inches). Larger or heavier tiles may require a stronger cement-based thin-set mortar for a secure, long-lasting hold.
In short, acrylic adhesive works well for light-duty wall repairs in wet areas — but choosing the right setting material based on location and tile size is essential for durability.
When to Use a Combination of Tile Crack Repair Methods?
Hairline cracks in tiles are generally very thin, measuring less than 1/16 inch (1.5 mm) in width.
When tile cracks are wider, more visible, or slightly deeper than a simple hairline fracture, relying on just one repair method may not provide the best outcome.
In such cases, combining techniques can improve both durability and appearance — sealing the crack structurally while also restoring the tile’s finish.
This layered approach works especially well in bathrooms and kitchens where moisture exposure is constant.
Option 1: Epoxy + Nail Polish (Strength + Cosmetic Finish)
For cracks that are noticeable but still stable:
- Fill the crack with clear epoxy to stabilize and seal it. Epoxy creates a strong, waterproof bond and prevents moisture from penetrating beneath the tile.
- Allow the epoxy to cure fully according to the manufacturer’s instructions.
- Once hardened, apply matching nail polish over the repaired area to restore color and gloss.
This method ensures the crack is structurally sealed while also blending it visually with the surrounding tile.
Option 2: Super Glue + Waterproof Paint (Quick Seal + Durable Cover)
For thinner but visible cracks or chipping:
- Use super glue (cyanoacrylate adhesive) to wick into and seal the crack.
- After it cures completely, apply a thin coat of waterproof enamel or tile repair paint to conceal the repair and enhance water resistance.
This combination is fast, affordable, and effective for non-moving cracks.
Extra Protection: Clear Urethane Sealer
To further reinforce your repair, consider applying a clear urethane or tile sealer over the treated area. A protective topcoat:
- Strengthens the surface
- Adds additional moisture resistance
- Helps maintain gloss consistency
- Reduces the risk of future surface cracking
While combination repairs won’t solve underlying structural movement, they significantly improve longevity and appearance — extending the life of your existing tile without the mess and cost of removal.

Repairing vs. Replacing the Cracked Shower Tile — What’s the Better Choice?
Cracked shower tiles can leave homeowners wondering whether a quick repair will suffice or if full replacement is the smarter long-term solution.
The right choice depends on the extent of the damage, moisture exposure, and how many tiles are affected.
Understanding when to patch and when to replace can save you time, money, and potential water damage down the line.
1- Repair small, isolated hairline cracks
If only one or two tiles have minor, surface-level hairline cracks and there’s no sign of water penetration, repairing them is usually worth the time and effort. Cosmetic fixes can extend the tile’s life without major expense.
2- Replace tiles with water damage or deep cracks
If water is seeping through the tile, grout is failing, or cracks are wide and spreading, replacement is the safer long-term solution. Moisture intrusion can damage the substrate behind the tile and lead to mold or structural issues.
3- Multiple cracked tiles? consider full replacement
When four, five, or more tiles across the area show visible cracking, repeated patchwork repairs often become inefficient. In such cases, replacing the affected section — or even retiling the area — may be more practical and cost-effective.
4- DIY replacement is possible for 1–2 tiles
For limited damage, you can replace individual tiles yourself. Start by drilling 3–4 small holes into the cracked tile to weaken it. Then carefully chip it out using a hammer and chisel, taking care not to damage surrounding tiles.
5- Prepare the surface properly
Remove all old grout, adhesive, and debris from the base before installing the new tile. Apply fresh mortar evenly, press the new tile firmly into place, and ensure it sits level with adjacent tiles.
6- Grout and clean before it sets
Once the mortar has cured, apply grout using a grout float, pressing it firmly into the joints. Wipe excess grout away with a damp cloth before it hardens to achieve a clean finish.
7- Know when to call a professional
If more than 3–4 tiles need replacement, or if matching older tiles is challenging, hiring an experienced tiler is recommended. Improper removal can damage surrounding tiles, and a professional can blend new tiles seamlessly with the existing layout.
Also, if you’re remodeling in the future, keep a few extra tiles on hand — discontinued styles can be difficult to replace later.
In short: repair for minor cosmetic issues, replace for structural or widespread damage — and don’t hesitate to bring in a professional when precision matters.
The bottom line
Over the years, I’ve learned that small cracks don’t automatically mean big problems. Sometimes they’re simply the result of minor settling, temperature changes, or everyday structural movement.
The key is acting early, sealing the crack properly, and restoring the tile’s surface before moisture finds its way in. Done correctly, the repair can be nearly invisible — and far less dramatic than ripping out perfectly good tile.
If you think repairing the cracked tiles is not worth your time and energy, you will likely need to replace them. Be sure to get in touch with a good tiler to do this for you.
Share the post "How to Repair Hairline Cracks in Shower Tile without Removing Them?"

Your basement is the perfect spot for building rooms you may not want in the main house. These may include Read more

Drywall is basically a panel composed of calcium sulfate dihydrate or gypsum. Other names include plasterboard, wallboard, sheetrock, gypsum board, Read more

Repainting the wooden window frames of your house is like putting on a nice, new summer dress after a long, Read more

While brushes and rollers are the traditional means of painting walls, spray paint is coming more in favor. For many Read more

Jack Luis is a semi-retired painter who loved painting his clients’ ideas on their walls.
He had worked as a painter for over a decade serving customers in areas such as Charleston, Mount Pleasant, Beaufort, and Georgetown, SC (South Carolina). Today in his free time, he likes to read and write about the newer techniques implemented in his profession. You may read more about him here or get in touch with him here.