

Paint brushes (and not paint rollers or sprayers) are generally the most appropriate tool to use for painting skirting boards. However, knowing the type that should be used can be tricky for beginners.
This guide will cover all the crucial aspects of selecting a suitable paintbrush for skirting boards.
Additionally, I will share whether you should use a roller for skirting along with some tips and advice so that you can achieve the desired finish without wasting your time.
Best Paint Brush for Skirting Boards
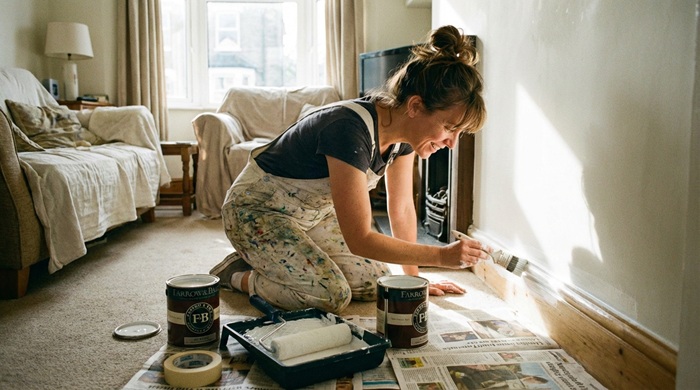
Painting skirting boards (or baseboards, for the technically inclined) is 90% floor-level yoga and 10% actual brushwork.
If you’re going to spend that much time on your knees, you might as well have a tool that doesn’t make you regret your life choices.
For a finish that looks like it was done by a pro—and not a caffeinated squirrel—here is the technical breakdown of what you need.
1- The Size
When refinishing skirting boards, size matters, but bigger isn’t always better when navigating 90-degree corners.
Smaller paint brushes of sizes 2″ to 4″ are usually recommended to paint hard-to-reach areas like corners of the skirting.
However, you may use a bigger brush (above 5 inches) to paint the more prominent, flat surfaces and if your house has much taller skirting boards.
This will offer quicker coverage and save you time as you won’t have to go over the same areas more than once during paint application.
| Size | Use Case |
| 1.5-inch | The “Scalpel.” Perfect for intricate Victorian molding or tight spaces behind radiator pipes. |
| 2-inch | The “Sweet Spot.” Offers the best balance of paint capacity and maneuverability for standard 4-7 inch boards. |
| 2.5-inch | The “Heavy Hitter.” Only recommended if you’re tackling oversized 9-inch modern skirting and have a very steady hand. |
2- The Geometry
While a flat sash brush is fine for broad surfaces, the angled sash brush is the undisputed MVP of trim work.
The varying bristle lengths allow the brush to hold a “reservoir” of paint in the heel while the longer “toe” provides a sharp point of contact.
This facilitates cutting-in with surgical precision. By leading with the long point, you can maintain a crisp line at the floor-to-wall junction without the need for miles of painter’s tape (which, let’s face it, always bleeds anyway).
In short, it’s best to test out a few different shapes and sizes before you start painting your skirting boards and check which works best.
3- The Brush Bristles
The type of brush and bristles you select for covering the skirtings should depend on the paint you have chosen for the project.
It’s best to use synthetic bristles (polyester/nylon) for refinishing skirting as they don’t shed and work well with all types of water-based paints (like latex or emulsion).
Look for tapered filaments (flagged tips). These microscopic splits at the end of the bristle increase surface area, allowing for a smoother release of paint and significantly reducing visible brush marks (ropiness).
However, if you’re using oil-based paint, a natural bristle brush is better because it reduces streaking.
Also, because of their ability to hold and release paint more effectively, they work more efficiently on textured surfaces.
Just remember that these brushes tend to shed, so invest only in a high-quality one and do not choose a cheaper alternative.
The “Pro’s Choice” Shortlist
When choosing from the best paint brush brands for skirting boards, look at options that balance precision for “cutting in” against the floor and wall with the ability to leave a smooth, stroke-free finish on the wood.
Wooster Silver Tip is my top favorite as it has extremely soft synthetic filaments that virtually eliminate brush marks.
If you want you can also check Purdy Monarch Elite with a thick “stock” that holds a lot of paint, reducing how often you dip.
But if you want a brand and a specific model that fulfills all the industry standards and is best suited for skirting boards, I would still recommend Wooster Silver Tip Angle Sash Paintbrush.

- Silver tip, 2-1/2", angle Sash, paint Brush, white & Silver chisel...
- Adds extra shine to your product
- Satin ferrule
*Last update on 2026-03-30 / Affiliate links / Images from Amazon Product Advertising API

Selecting the Right Skirting Board Brush
Choosing the right brush for skirting boards is the difference between a professional-looking finish and a messy DIY job.
Since skirting requires precision near floors and carpets, your choice should be strategic.
Here is the breakdown based on your criteria:
1. Material of the Skirting
The surface texture determines how much “grip” or “flex” you need from your bristles.
MDF (Medium Density Fibreboard): Usually very smooth. Use synthetic bristles to avoid visible brush marks, as MDF doesn’t have a natural grain to hide imperfections.
Natural Softwood (Pine): Can be slightly porous. A firm synthetic or a blend works best to push paint into any grain or knots.
Hardwood (Oak/Walnut): Often stained or varnished rather than painted. Use a natural china bristle brush if using oil-based stains, as they hold and release the product more fluidly.
Reclaiming/Old Wood: If the surface is pitted or uneven, a thicker, round brush can help bridge the gaps in the wood better than a flat one.
2. Type of Paint to be Used
The chemistry of the paint dictates the bristle material to prevent the brush from ruining.
Water-Based (Acrylic/Latex): Use Synthetic (Nylon/Polyester) bristles. Natural bristles absorb water, become limp, and lose their shape, making it impossible to paint a straight line.
Oil-Based (Gloss/Satin/Eggshell): Use Natural bristles (like Hog Hair). These have “split ends” (flags) that hold more paint and allow for a much smoother flow with thicker oil-based formulas.
Hybrid (Water-based Alkyds): These are common now; a high-quality synthetic blend is the safest bet to handle the quick drying time while maintaining a soft touch.
3. Finish Required
The “look” you want dictates the shape and quality of the brush.
The “Mirror” Gloss Finish: Requires a fine-tipped synthetic brush or a high-end natural bristle. The goal is “no brush marks,” so look for “SRT” (Solid Round Tapered) filaments.
Clean Edges (The “Cut-in”): Always choose an Angled Sash Brush (usually 1.5 to 2 inches). The slanted tip allows you to get right into the corner where the skirting meets the wall or floor without needing as much masking tape.
Textured or Rustic Finish: A natural bristle brush with a blunt cut will leave slight tracks in the paint, which can look more authentic on period properties or “shabby chic” styles.
Large Areas vs. Detail: If your skirting is tall and ornate (Victorian style), use a 2-inch flat brush for the main body and a small round fitch brush for the intricate carvings.
Painting the Skirting Boards – Easy Tips & Ideas
When you need to brush skirting for a refreshed new look or to prepare the house for selling, it’s important to choose the right brush and paints along with following the right steps.
Here are some easy steps, tips, and ideas to get you started…
1- Prepare the skirting boards
This involves removing any dirt, dust, or debris from the surface of the skirting boards using a damp cloth or a vacuum cleaner with a soft brush attachment.
Depending on a few factors, you might need to remove skirtings or baseboard trims before painting. So make sure you check if you need to.
2- Choose the correct primer paint
To paint skirting boards, the two most popular options are oil-based enamel and water-based paints like latex and acrylic.
You can also go for an all-in-one primer and paint to save time and effort. Choose the type of paint based on the material of your skirting boards, whether it’s wood, metal, or PVC.
Also, for a polished finish and easy cleaning of your skirting boards, consider using semi-gloss or high-gloss primer paint.
And to complement your walls, select a trim color scheme ranging from classic white or cream to modern shades like black or grey.
3- Apply the primer/paint on skirting and let it dry
To paint your skirting boards, select a suitable paintbrush designed for your skirting type and apply even strokes of the primer in a single direction.
Make sure that you cover all the corners and edges properly while painting.
If you need to paint multiple rooms, focus on one room at a time to complete the painting of one room before moving on to the next one.
Once you have completed painting the skirting boards in your home, be sure to let the paint dry completely.
It typically takes around two to three hours, but it is advisable to consult the instructions provided by the manufacturer on the paint can or primer for accurate drying times.
4- Apply a top coat and enjoy your newly painted skirting boards
After the paint has fully dried, use even strokes to apply a top coat with your paintbrush. This will safeguard the paint and enhance its longevity.
You can go for either a clear or colored top coat based on the skirting material and desired look. Once the top coat dries, your home will have a renewed appearance that is sure to impress visitors.
Do not forget to clean your paintbrushes thoroughly after use and to store them properly for future projects.
Brush or Roller – Which Works Precisely for Skirting Boards?
Choosing between a brush and a roller for skirting boards is a bit like choosing between a scalpel and a sledgehammer.
One is for the fine-tuned artistry; the other is for getting the job done before your coffee gets cold.
While many DIYers default to a single tool, achieving a professional, “factory-level” finish requires understanding the physics of paint application.
Here is the breakdown of the brush vs. roller debate.
The Brush: The Precision Specialist
When you are staring down a skirting board with a complex Ogee or Torus profile, the brush isn’t just a tool; it’s a surgical instrument.
For these intricate moldings, a 2-inch synthetic angled sash brush is the undisputed champion.
Unlike natural bristles—which tend to soak up water and lose their “spring” like a bad haircut in the rain—synthetic filaments (usually a blend of nylon and polyester) are engineered to maintain a sharp, stiff edge.
This allows you to “cut in” along the carpet line or the wallpaper with microscopic accuracy.
If your skirting is under three inches tall or features deep, ornate architectural grooves, you should stick strictly to the brush; a roller here would simply bridge over the details, leaving unsightly pools of un-leveled paint in the recesses.
The Roller: The Efficiency Expert
If your home leans toward modern minimalism with wide, flat “Kershaw” or square-edged boards, using only a brush is an exercise in masochism.
This is where the 4-inch high-density foam or short-pile microfiber roller shines. Technically speaking, a roller allows for a much more consistent Wet Film Thickness (WFT) across a large surface area, which is the secret to a uniform sheen.
However, the “witty” truth is that rollers can be deceptive; use a cheap, fluffy sleeve, and you’ll end up with an “orange peel” texture (technical term: stippling) that looks more like a citrus fruit than a professional finish.
For a “factory-smooth” look on flat timber, the roller is your best friend for speed, provided you don’t overload it and cause “fat edges” at the top of the board.
The Professional Hybrid: Rolling and Laying Off
For those who demand a flawless finish, the pros use a “tag-team” approach known as Rolling and Laying Off.
You begin by using the mini-roller to rapidly “charge” the board with paint, covering the wide flat sections in seconds.
Before the paint has a chance to begin its initial set, you follow up immediately with your sash brush—using long, light, continuous strokes from one end to the other.
This “laying off” technique strikes a perfect balance: the roller ensures the correct volume of paint is applied, while the brush strokes out the roller’s stipple to create a silky, linear finish.
This is the gold standard for water-borne acrylic satins, which dry quickly and require a fast hand to maintain a “wet edge.”
Knowing which path to take…
The decision to go “solo” with a brush or “hybrid” with a roller depends entirely on the geography of your wood.
You should use the combination method whenever you have a flat surface wider than two inches; it saves time and physical strain on your wrist while ensuring the paint levels out beautifully.
Conversely, you should stick to only a brush when dealing with historic, multi-tiered Victorian skirting or when working in tight alcoves where the bulky frame of a roller would inevitably “clobber” the adjacent wall.
In short: use the roller for the heavy lifting and the brush for the finishing touch—your knees (and your eyesight) will thank you.
The bottom line
Selecting the right brush is the difference between a DIY look and a professional, “factory” finish.
While an old all-purpose brush might seem convenient, the long horizontal strokes and tight corners of skirting boards demand a tool with precision and finesse.
By investing in a premium brush, you aren’t just buying a tool; you’re ensuring a streak-free application and a more comfortable grip for those long hours on the floor.
Ultimately, the right equipment saves you time on touch-ups and delivers a flawless, durable sheen that protects your trim for years to come.
Share the post "Best Paintbrushes for Finishing Skirting Boards"

From building furniture and refurbishing existing furnishings to touching up the doors, tables, and other wooden pieces in your home, Read more

Getting the best paint job means more than using the right paint. In addition to having good brushes and rollers, Read more

You are in the middle of sanding your walls, and you realize that there are still many more pieces of Read more

I remember the early days when my father, as a painter, did not have many options for spraying the cabinets Read more

Jack Luis is a semi-retired painter who loved painting his clients’ ideas on their walls.
He had worked as a painter for over a decade serving customers in areas such as Charleston, Mount Pleasant, Beaufort, and Georgetown, SC (South Carolina). Today in his free time, he likes to read and write about the newer techniques implemented in his profession. You may read more about him here or get in touch with him here.