

You may see in many neighborhoods, gardens, or forests that the bottom of the trees is painted white.
This may look rather odd at first, but there are good reasons why many of these trees are painted white at the bottom of their trunks.
This simple coat is actually a clever, time-tested technique used by gardeners, farmers, and arborists to protect trees from a surprising number of threats.
In fact, painting tree trunks white near their base is an age-old tradition found in various parts of the world with plenty of background information and fascinating historical facts.
With such an intriguing topic before us, let’s get started to know it better and clear the doubts…
Why is Tree Trunk Painted White?
painted tree bottoms might look decorative, almost like the trees are wearing white socks, but the purpose is far more practical.
Here are the main technical reasons arborists and growers paint tree trunks white:
1. Prevents winter sunscald (southwest injury)
One of the most important reasons is the prevention of winter sunscald, sometimes called southwest injury.
During cold months, sunlight warms the south or southwest side of a tree trunk during the day. When temperatures drop rapidly at night, the warmed bark cools too quickly.
This repeated freeze–thaw cycle damages living tissue beneath the bark—particularly the cambium layer, which is responsible for growth. The result can be cracked, sunken, or peeling bark.
White paint reflects sunlight, keeping trunk temperatures more stable and reducing the thermal shock that leads to bark splitting.
2. Reflects heat and prevents sunburn
Young trees with thin bark—such as maple, apple, citrus, or cherry—can suffer from sunburn in hot climates.
Excessive solar radiation overheats the bark and damages cambial tissues, which can lead to dehydration, cracking, and long-term structural weakness.
A white coating increases the albedo (light reflectivity) of the bark surface. By reflecting sunlight rather than absorbing it, the trunk stays cooler, and the living tissues underneath remain protected from heat stress.
3. Improves night visibility along roads
In many rural or roadside plantings, white-painted trunks serve a practical safety function. At night, the pale surface reflects vehicle headlights, making trees more visible to drivers.
This simple visual cue helps reduce accidents where vehicles might otherwise strike trees along roadsides, farm lanes, or orchard paths.
4. Adds a layer of protection against pests and diseases
The lower trunk is often where pests and pathogens gain entry into a tree.
Whitewashing can act as a mild barrier against boring insects, fungal spores, and certain bark-invading pests.
Traditional lime-based washes are slightly alkaline, which can discourage microbial growth and some insects.
While it is not a complete pest-control solution, it provides an extra defensive layer—especially for young trees.
5. Discourages damage from animals
Animals such as deer, rabbits, and rodents frequently chew or rub against young tree bark, particularly during winter when other food sources are scarce.
This behavior can strip bark and expose the cambium, potentially killing the tree.
A white-painted trunk can serve as a visual deterrent and makes the bark less attractive for chewing or rubbing.
In orchards, it also helps farmers easily spot early signs of animal activity or damage.

What Type of Paint to Use on Tree Trunks?
When painting tree trunks for protection, the safest option is white, water-based latex paint.
Arborists typically recommend diluting it with water—usually a 1:1 ratio (50% paint, 50% water)—so the coating remains breathable while still reflecting sunlight.
For animal deterrence in some locations, anti climbing paint may also be applied to the tree’s lower trunk. This thick, greasy coating discourages animals from climbing or rubbing against the bark, although it should be used carefully so it does not cover large areas of living bark.
Lime whitewashing is another traditional option, especially in orchards and rural areas.
It is made by mixing hydrated lime (calcium hydroxide) with water to create a thin slurry that reflects sunlight and has mild antifungal and insect-repelling properties.
Because it is breathable and naturally alkaline, lime wash has long been used to protect tree bark from sunscald, pests, and fungal growth.
That said, it’s good to avoid oil-based paints on the bottom of trees. They form a dense, impermeable film that can trap moisture against the bark and potentially damage the living cambium layer underneath.
Some oil formulations may also contain solvents that are harmful to young trees.
What color to pick?
For painting the bottom of trees and nearby wooden poles, white is important for a reason.
Darker colors absorb heat, while white reflects sunlight and helps keep bark temperatures stable, reducing the risk of sunscald and bark cracking.
However, red or green paint is sometimes used for marking or identification, such as:
- Property or boundary markers
- Decorative landscaping in parks or gardens
- Forestry markings for trees scheduled for cutting or monitoring
Reliable white latex options are widely available from brands such as Glidden, Behr and PPG, which can be found at most paint or home-improvement stores.

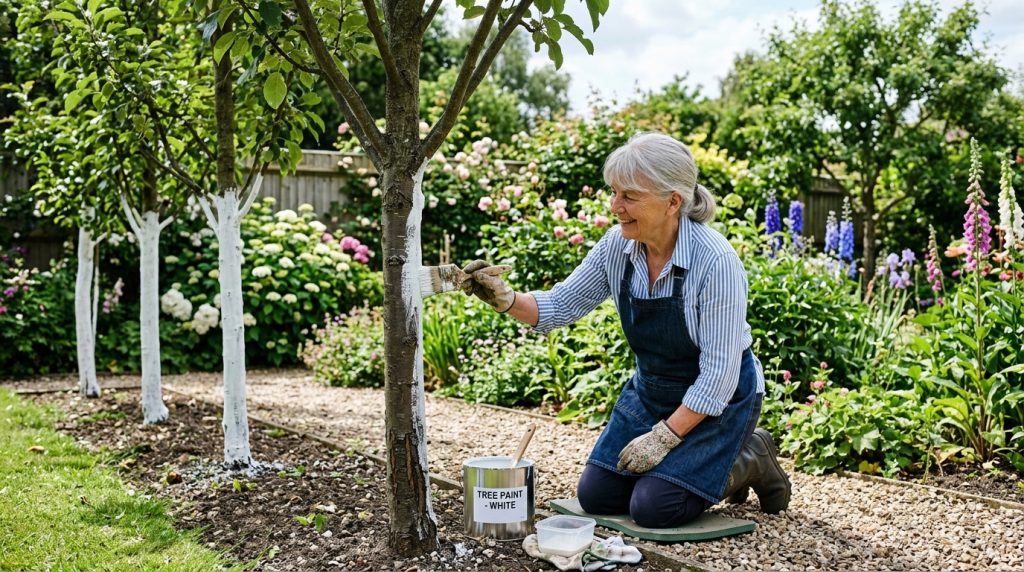
Painting Tree Trunks Bottom White – Step by Step
Painting tree trunks is a simple task, but doing it correctly ensures the bark receives protection without harming the tree.
The goal is to create a thin, breathable reflective coating that shields the lower trunk from sunscald, pests, and temperature stress.
Step 1. Prepare the Paint Mixture
Start with white water-based latex paint. For general trunk protection, dilute it with water so it does not form a heavy film.
- Standard protection: Mix about 1 part paint with 1 part water.
- For sunscald protection: Some orchardists use a mixture of ⅓ paint, ⅓ water, and ⅓ joint compound to improve coverage and reflectivity.
- For borer-prone areas: Use undiluted latex paint for a thicker barrier.
Stir thoroughly until the mixture is smooth and easy to brush.
Step 2. Choose the Right Weather
Pick a dry, calm day, preferably with mild sunshine.
Avoid rainy, windy, or extremely hot conditions. Dry weather helps the coating adhere properly and prevents streaking or runoff.
Step 3. Clean the Trunk
Before painting, remove loose bark, dirt, or moss from the lower trunk with a soft brush or cloth.
This helps the paint adhere evenly and prevents moisture from being trapped underneath.
Step 4. Apply a Thin, Even Coat
Using a soft paintbrush, apply a thin layer of the mixture to the trunk.
Start at the base of the tree and work upward with smooth strokes. Avoid thick layers that could seal the bark too tightly.
Step 5. Cover the Correct Height
Paint the trunk from ground level up to about 2–3 feet. This is the area most vulnerable to sunscald, pest entry, and temperature stress.
The reflective coating helps stabilize bark temperature and protect the living cambium layer underneath.
Step 6. Prevent Drips and Puddles
Be careful not to let paint drip, pool, or collect in bark crevices, as excess moisture trapped under thick paint can encourage rot.
Step 7. Let It Dry and Reapply if Needed
Allow the first coat to dry for about 24 hours. Step back and inspect the coverage.
If the bark still shows through heavily, apply a second light coat the next day for better protection.
When done correctly, this simple practice creates a protective “shield” for the most vulnerable part of the tree—helping young or thin-barked trees survive both scorching summers and harsh winters.
Can You Paint Over the Tree Sap – What to Do Instead?
If you have ever seen trees such as sugar maple, black maple, or box elders – they produce a sap that can get very sticky and hard to clean.
You might wonder if you can paint over the sap to make the tree trunk look nicer or make the sap go away.
In my opinion, it’s not worth wasting your time covering the sap up with paint. If you do, the sap will easily seep through any primer, paint, or stain, eventually causing the paint to bubble and peel.
There are two things you can do instead…
First, wait for the sap to dry out and then sand it off before painting. There will be a time when the juice stops coming out. You can then sand it down until it’s flush with the rest of the tree.
The second option is to remove the sap manually with a putty knife or another sharp object.
When you’re finished scraping off the extra fluid, use a cleaning solution such as mineral oil or turpentine to clean any residual sap from the wood. Once the sap is removed, you can paint or stain the tree as desired.
Remember that the sap may come back at some point, so you’ll need to be vigilant about checking for it and removing it as necessary.
But with a little effort, you can have a beautifully painted and protected tree that will last for years.
Share the post "Why Do People Paint Tree Trunks White at the Bottom?"

When you put up new drywall, it may seem that all you need to do is add two coats of Read more

Estimating the amount of paint you will need to paint your house is not rocket science. But it can be Read more

To dry appropriately, paint uses four components; Additives, Binder, Filler, and Solvent. The effectiveness of all four will depend on Read more

Painting your house is always a big deal, with lots of questions and decisions to work on. Though every house Read more

Jack Luis is a semi-retired painter who loved painting his clients’ ideas on their walls.
He had worked as a painter for over a decade serving customers in areas such as Charleston, Mount Pleasant, Beaufort, and Georgetown, SC (South Carolina). Today in his free time, he likes to read and write about the newer techniques implemented in his profession. You may read more about him here or get in touch with him here.